Contact Us

Use the form on the right to contact us.

You can edit the text in this area, and change where the contact form on the right submits to, by entering edit mode using the modes on the bottom right. 

2210 Haines Avenue
Rapid City, SD, 57701
United States

605-341-5044

Someone's In the Kitchen is an independent, gourmet kitchenware store in Rapid City, South Dakota. We are your shop for "all things kitchen". Enjoy a leisurely shopping experience in the world of kitchen and home.

RECIPE ARCHIVE IV

Filtering by Category: Dinner

Classic Potato and Caramelized Onion, Gruyère Gratin

Lia Soneson

Experience this classic potato presentation -- thinly sliced potatoes layered with a distinctive Mornay sauce (a Béchamel sauce with Gruyère cheese added). The addition of savory, caramelized onions and fresh thyme infuses comforting flavors into every bite.


Classic Potato and Caramelized Onion, Gruyère Gratin
Serves 6 - 8

Ingredients:

2 tablespoons butter
2 medium sweet onions, sliced pole to pole
1 teaspoon fresh thyme leaves
2 lbs Russet potatoes (about 2-3 medium to large potatoes), washed, peeled, and thinly sliced with a mandoline
3 cloves garlic, minced

Mornay Sauce Ingredients:

4 tablespoons butter
1/4 cup all-purpose flour
3 cups whole milk
1-1/2 teaspoons Kosher salt
1/4 teaspoon black pepper
2 cup grated Gruyère, 1/4 cup reserved for topping the gratin

Directions:

1. Prepare the caramelized onions. In a large skillet or sauté pan, melt 2 tablespoons of butter and sauté the sliced onions over medium heat. Once the onions start sweating, turn the heat down to medium-low. Stir the onions occasionally, as needed. Allow them to cook slowly for 35-45 minutes until a deep brown color is formed and they become fully caramelized. Add the garlic and cook for another 2-3 minutes. Add the thyme leaves and stir allowing the fragrance to bloom.

2. While the onions cook, prep the potatoes. Use a sharp peeler to peel the potatoes. Rinse off, then slice into 1/8” thick slices using a handheld mandoline.

3. Preheat the oven to 400 degrees F.

4. Prepare the roux. In a separate, smaller saucepan, heat the remaining 4 tablespoons of butter. Once the butter has melted, add the flour and whisk continuously until the mixture is completely smooth, as it cooks for about 1 - 2 minutes. This process removes the raw flour flavor and helps create a silky sauce.

5. Create a Béchamel sauce by very slowly pouring milk into the roux. Continue whisking the mixture until the sauce is smooth. Add in the salt and pepper and continue whisking over medium-low heat for 3-5 minutes or until the sauce thickens and becomes very creamy.

6. Remove from heat and transform the sauce into a Mornay sauce by slowly adding in the shredded Gruyère cheese. Whisk until the sauce is smooth, and the cheese is well incorporated. The sauce will continue to thicken while maintaining its creamy texture.

7. Layer the gratin. Butter the bottom and sides of a large baking dish and lay a single layer of potatoes, then a layer of caramelized onions. Pour some of the sauce over the potatoes and continue to layer the potatoes, onions, and sauce to form additional layers. Repeat this step until all of the potatoes are used (or until the layers reach within 1/2” from the top of the dish).

8. Top the final layer of potatoes with the remaining onions, then sauce, and finally sprinkle with the reserved 1/4 cup of cheese.

9. Cover the gratin with a tight-fitting lid or foil and bake for 60 minutes. Remove the lid or foil, and continue to bake for another 10 minutes, or until the top turns golden brown and the gratin is hot and bubbling.

10. Garnish with additional fresh stems of thyme, and serve while hot.

Creamy One Pot Lemon Pasta

Lia Soneson

This is a keeper of a recipe for its ease and fabulous flavor! The creamy, rich pasta is punctuated by bright lemon flavors that everyone will love! Made all in one pot, this dish is perfect for a quick (but very satisfying) weeknight dinner. Serve with a side of roasted baby broccoli for a rounded out menu!


Creamy One Pot Lemon Pasta
Serves 2 - 4

Ingredients:

2 tablespoons butter
2 tablespoons olive oil
1/4 cup shallot, finely minced
3 cloves garlic, thinly sliced
1/4 teaspoon crushed red pepper
1/4 cup white wine
1-1/2 cups chicken broth
1 cup half-and-half, warmed in the microwave, or stovetop to room temperature
8 ounces angel hair pasta
1/4 cup finely grated Parmesan cheese
Salt and pepper, to taste
Basil leaves, julienne cut for garnish
Lemon zest, for garnish
2 tablespoons lemon juice
1/2 cup Panko breadcrumbs toasted in a skillet with
2 tablespoons butter until golden brown, for garnish

Directions:

1. In a large braiser, cook the shallot in the butter and olive oil. Once the shallot is translucent, add the sliced garlic and crushed red pepper flakes and cook until nicely fragrant.

2. Add the white wine and simmer until the wine is reduced and absorbed.

3. Add the chicken broth and half-and-half, and bring to a simmer.

4. Add the angel hair pasta stirring often while simmering until the pasta is cooked al dente -- about 4-5 minutes.

5. Remove from the heat and stir in the Parmesan cheese and lemon juice. Stir with tongs until the pasta is well-coated, and the sauce is slightly thickened. Taste, and season with Kosher salt and pepper.

TIP: Serve with a side of roasted broccolini, if desired. To make the broccolini, toss the broccolini with olive oil and season with Kosher salt and pepper. Roast spread out in a single layer on a sheet pan at 425 degrees F for 12-15 minutes or until crisp tender.

6. Garnish with toasted Panko bread crumbs, basil shreds, and lemon zest.

Thin Crust Pizza with Fresh Mozzarella, Chicken Sausage, Red Onion & Basil

Lia Soneson

Pizza is loved by everyone for a reason -- it’s so tasty! Try our recipe for an overnight pizza dough for the ultimate crispy, yet chewy thin-crust pizza experience. Practice patience as the dough rests, then enjoy how easily the final pizzas come together. Enjoy your handcrafted pizzas with our suggested toppings, or experiment with your own. It's a pizza party!


Thin Crust Pizza with Fresh Mozzarella, Chicken Sausage, Red Onion & Basil
Makes three 10-12" pizzas

Dough Ingredients:

1-1/2 cups warm water - 110 degrees F
1 packet of active dry yeast
1 teaspoon sugar
3-1/2 - 4 cups all-purpose flour
1 teaspoon Kosher salt
2 tablespoons olive oil

Sauce Ingredients:

1 can (14.5 oz) whole San Marzano tomatoes
1 clove garlic
1/2 teaspoon Kosher salt
1/2 teaspoon sugar
1/4 teaspoon balsamic vinegar

Topping Ingredients:

Shredded Parmesan cheese
Fresh mozzarella, sliced
Spicy Italian chicken sausage, sliced
Red onion, thinly sliced
Basil, chiffonade cut as garnish

Directions:

1. Measure and heat the water to 110 degrees F. Add the water to the bowl of a stand mixer and add the sugar. Sprinkle the yeast on top. . Allow the yeast to stand undisturbed for a few minutes. It's ready to use when when it looks slightly foamy on top.

2. While the yeast is dissolving and activating, measure out the olive oil, salt, and flour.

3. Add the olive oil and salt to the yeast and water. Add one cup of the flour and mix on low for two minutes. Slowly, add 3 cups of flour and mix until a dough ball forms. Remove the dough from the mixer and knead a few times on a flour-dusted work surface. Form the dough into a ball.

4. Place the dough in a bowl coated with olive oil, and cover the dough ball with a kitchen towel. Let it double in size -- about 30 minutes.

5. Transfer the dough to a floured surface and divide it into three even pieces. Knead each section of dough individually, adding a little bit of additional flour to the dough and the working surface, as needed, until each dough ball is smooth, and not too sticky. Dust the dough balls with more flour, and place on a large plate under plastic wrap. Let the dough balls rest overnight in the refrigerator.

6. After the dough rests overnight, remove the plate from the fridge, and let the dough come to room temperature -- about two hours.

7. Place a pizza stone or baking steel on the middle oven rack and preheat the oven to 475-500 degrees F. Preheating the oven will ensure that the stone will be hot and ready when it's time for the pizzas to bake. A hot, preheated pizza stone produces a crispy bottom crust.

8. Prepare the sauce. In a blender or food processor, or directly in the tomato can using an immersion hand blender, combine all of the sauce ingredients and blend until smooth.

9. Prepare the pizza toppings. Slice the fresh mozzarella, the chicken sausage, red onions, and basil.

10. Once the oven is preheated, get ready to stretch and assemble the pizzas! Select one ball of dough. With floured hands begin to flatten the ball into a round disc, about 8”- 12" in diameter, starting from the center and working outward to form a round crust. The top of the dough ball will remain on top through this process. Try stretching the dough with the back of your hand, and avoid making holes.

11. Once the dough is formed, place it on a piece of parchment paper placed on top of the pizza peel for easy transferring to the pizza stone once assembled. Spread a thin layer of sauce to within about 1 inch from the edge. Add a layer of shredded parmesan cheese, then a layer of fresh mozzarella cheese. Finish the pizza with sliced chicken sausage and thinly sliced red onions. Avoid overloading the pizza with too many toppings.

12. After adding the toppings, transfer the pizza to the oven using a pizza peel.

13. Bake the pizza until the cheese melts and the crust is golden brown. Remove from the oven. Remember to allow the pizza to cool a little before eating. Garnish with fresh basil and enjoy!

Steak Diane

Lia Soneson

Looking for a luxurious, romantic dinner for two? Try our version of the steakhouse classic, Steak Diane. To learn how to make a perfectly seared filet, and embellish it with a creamy, decadent mushroom sauce, read on! We were impressed -- you will be, too!


Steak Diane
Serves 2

Ingredients:

4 tablespoons butter, divided
1 tablespoon olive oil
2 tenderloin beef filets, lightly pounded to be 1-inch thick
Kosher salt and pepper
1/2 cup finely minced shallot
8 oz cremini mushrooms, sliced
2 tablespoons chives, sliced for garnish
1/4 cup cognac or brandy
1 tablespoon Worcestershire sauce
1 tablespoon Dijon mustard
1 teaspoon tomato paste
1 teaspoon lemon juice
1/2 cup beef broth
1/4 cup heavy whipping cream

Directions:

1. Using a layer of parchment paper and a meat mallet, slightly pound the steaks to be about 1-inch thick. Season the steaks generously with Kosher salt and pepper, and allow to set at room temperature for about 30 minutes before cooking.

2. Prepare the shallots by mincing. Brush off and slice the mushrooms. Ready the garnish by slicing the chives before starting the cooking.

3. Melt 2 tablespoons of butter and the olive oil in a cast iron skillet. Allow the oil and butter to heat. Once hot, add the steaks. Sear the steaks undisturbed for 2-3 minutes on each side. Continue to cook until the steak reaches the desired level of doneness. Remove the steaks from the pan, and let rest on a plate tented with foil while you prepare the sauce. (Remember, the steaks will continue to rise in temperature by a few degrees as they rest.)

4. Make the Sauce Diane. Add the remaining 2 tablespoons of butter to the skillet. Cook the mushrooms until browned on all sides. Add the shallot, and cook until translucent.

5. Add the cognac or brandy. Light the pan on fire if you desire some drama in the kitchen. Or, just let the brandycook down. Stir in the Worcestershire sauce, Dijon, tomato paste, lemon juice, and beef broth. Allow the sauce to simmer for about 5 minutes. Stir in the heavy cream and cook for another 2 minutes, or until the sauce thickens slightly. Taste the sauce, and adjust the seasonings with additional salt and pepper.

6. Serve the steaks with a generous serving of sauce. Garnish with chives.

Creamy Tomato Soup with Sausage and Tortellini

Lia Soneson

This hearty and veggie-packed soup is sure to satisfy. Loaded with vegetables, this soup becomes even more delicious with the addition of spicy sausage and cheese tortellini. We love how easy it is to make. It will definitely be part of our winter menu rotation!


Creamy Tomato Soup with Sausage and Tortellini
Serves 4-6

Ingredients:

1 pound spicy Italian sausage, formed into 1/2-inch sized chunks
2 tablespoons butter
2 tablespoons olive oil
1 medium onion, diced
3 stalks celery, (about one cup) diced
3 carrots, (about one cup) sliced
1 red pepper, diced
2 cloves garlic, minced
1/2 cup white wine
1 teaspoon dried oregano
1 teaspoon dried basil
1-1/2 teaspoons Kosher salt
1/2 teaspoon freshly ground pepper
4 cups chicken broth
1 can (28oz) fire-roasted crushed tomatoes
8-10 ounces pre-made cheese tortellini
1/2 cup heavy cream1 bunch kale leaves (or about 5 ounces), leaves stripped and chopped into bite-sized pieces
1/4 cup fresh basil, julienned, optional for garnish
Shaved Parmesan cheese, for garnish

Directions:

1. In a large, heavy-bottomed soup pot, or Dutch oven, brown the sausage. Cook the 1/2-inch, bite-sized chunks of sausage until thoroughly cooked and browned on all sides. If the sausage starts smoking or burning in the pot, add a little water as you cook the sausage. Stir the sausage often while it cooks. Once the sausage is cooked, remove and drain any excess grease by placing on a paper towel-lined plate. Set aside as the rest of the soup is assembled.

2. In the same soup pot, add the butter and olive oil. Sauté the onion, celery, carrots, and red pepper until the onions are translucent and softened. Add the garlic, and cook for an additional two minutes.

3. Add the white wine, cook and reduce until all of the wine is evaporated.

4. Add the oregano, basil, Kosher salt, and pepper. Then, add the chicken broth and the crushed tomatoes. Bring to a simmer. Simmer for 5-10 minutes to allow the flavors to blend. Tip: If you have saved an old Parmesan cheese rind this is a great time to add it to this soup. The simmering rind will add a deep umami taste to the final flavor of the soup.

5. After the soup simmers, remove the Parmesan cheese rind. Carefully use an immersion hand blender to puree some of the soup directly in the pot. Tip: Puree this soup as much as you'd like. We prefer to have some veggie chunks at the end, and use a light touch while pureeing. If you prefer it smoother, puree longer.

6. Return the soup pot to the stove and add the cheese tortellini. Cook until the tortellini are just done and start floating to the top. Stir in the heavy cream.

7. Stir in the chopped kale and add the cooked sausage back into the pot. The kale will quickly wilt and mingle into the soup.

8. Serve warm with a garnish of basil and shaved Parmesan cheese on top.

Brown Rice Bowls with Soy Chorizo, Roasted Sweet Potatoes, Black Beans, Corn, Green Onion, and Avocado

Lia Soneson

We love starting the new year off with a protein-packed bowl full of nutritious fuel. This dish features a spicy chorizo made with soy, and is loaded with flavorful cilantro-lime brown rice, black beans, corn, roasted sweet potatoes, and avocados. YUM!


Brown Rice Bowls with Soy Chorizo, Roasted Sweet Potatoes, Black Beans, Corn, Green Onion, and Avocado
Makes 4 - 6 bowls

Ingredients:

12 oz chorizo made from soy
1 cup brown rice
2 cups vegetable stock
2 tablespoons olive oil Juice and zest of one lime, about 1/4 cup lime juice
2 tablespoons cilantro, chopped
2 medium (about 2 pounds) sweet potatoes, diced into 1/2-inch cubes
3 tablespoons olive oil1/
2 teaspoon cumin
1/2 teaspoon garlic powder
1/4 teaspoon paprika
1/4 teaspoon chili powder
1/4 teaspoon cayenne
1 teaspoon Kosher salt
1/4 teaspoon freshly ground pepper
1 can (15 oz) black beans, drained and rinsed
1 cup frozen corn, thawed
2 avocados, sliced
6 green onions, sliced

Garnishes:

Cilantro leaves
Sour cream, optional
Hot sauce, optional

Directions:

1. Preheat the oven to 450 degrees F.

2. Make the brown rice in a saucepan with a lid. Rinse the brown rice before cooking. Using a 2:1 liquid-to-grain ratio, cook the brown rice in vegetable stock (or lightly salted water) until tender, about 35-45 minutes. Once the rice is tender, fluff with a fork and mix with the lime juice, lime zest, and chopped cilantro.

3. Roast the sweet potatoes. Peel and dice the sweet potatoes into 1/2-inch cubes. Toss with 3 tablespoons of olive oil, the cumin, garlic powder, paprika, chili powder, and cayenne until coated. Roast for about 20-25 minutes, stirring halfway through. Roast until fork tender. Set aside until ready to assemble the bowls.

4. Cook the soy chorizo in a large skillet. Finely crumble when cooking until well-browned, then set aside until ready to assemble the bowls.

5. Drain and rinse the beans, and thaw the corn in the microwave in a small bowl. or in a skillet.

6. Slice the avocado, green onion, and chop more cilantro for garnish.

7. Load the bowls with all of the prepped ingredients and enjoy! Serve with a dollop of sour cream and a drizzle of hot sauce, if desired.

Standing Rib Roast with Creamy Horseradish Sauce

Lia Soneson

This time of year, we're thinking about special occasions where we'll be hosting others. On rare occasions (pun intended), we splurge and prepare a standing rib roast. It makes a stunning presentation and tastes fabulous. A good cut of meat really doesn't need much -- but we do enjoy slathering an aromatic mixture of butter, garlic, and herbs on the top cap and ends. The addition of these subtle flavors are just the right touch. Include our creamy horseradish sauce, served on the side, for the perfect finishing touch!


Standing Rib Roast with Creamy Horseradish Sauce
Serves 8

Ingredients:

1 standing rib roast, 4 bones; approximately 6-7 pounds
a hearty sprinkling of Kosher salt and pepper, for searing
6 tablespoons butter, softened
1 tablespoon Dijon mustard
1 tablespoon Worcestershire
4 cloves garlic, minced
1 tablespoon rosemary leaves, minced
1 tablespoon freshly ground black pepper
1 tablespoon Kosher salt

Horseradish Cream Ingredients:

1-1/2 cups sour cream
1 tablespoon fresh lemon juice
8 oz prepared horseradish (add slowly and adjust this amount to your preference)
1/2 teaspoon of Kosher salt
Chives for garnishing

Directions:

1. Preheat the oven to 450 degrees F. Prepare the standing rib roast by allowing it to come to room temperature; this will take about two hours. (When buying the roast, ask the butcher to separate the rack of bones, trim the roast, then tie the bones and the roast together.) Place the roast, bone-side down, fat-side up, in a large and oiled roasting pan. Sprinkle generously with the salt and pepper on all sides of the roast. If using a thermometer probe, (and we recommend that you do), place it in the thickest portion of the meat ensuring that it is not touching a bone. Sear the meat in the hot oven for 20 minutes.

2. Meanwhile in a medium bowl, make a paste of the butter, mustard, Worcestershire, minced garlic, rosemary, pepper, and Kosher salt. After the roast sears for 20 minutes in the oven, remove the roast from the oven and slather the herbed paste over the top and sides of the roast with a spatula.

3. Reduce the temperature to 350 degrees F. Return the roast to the oven until the internal temperature reaches 118 degrees F for just medium-rare, the internal temperature will rise to 125 degrees F. while resting. (Or about 15 minutes per pound for rare, 17 minutes for medium).

4. Transfer the roast to a carving board, loosely tent with foil, and allow to rest for 20 minutes before carving.

5. Horseradish Cream: Whisk all of the ingredients together. Top with a garnish of fresh chives.

Truffled Mashed Potatoes

Lia Soneson

Looking for holiday potatoes with a little something extra? Try our truffled mashed potatoes this season! Subtle truffle flavors marry well with creamy potatoes. The result? An elevated side dish suitable for including on any dinner menu. Sooo delicious!


Truffled Mashed Potatoes
Serves 6 - 8

Ingredients:

4 pounds Russet potatoes, peeled and roughly chopped
2 tablespoons Kosher salt
4 tablespoons butter, brought to room temperature
1 cup half-and-half, brought to room temperature
2-3 teaspoons black truffle salt, season according to taste
Kosher salt and freshly ground black pepper, to taste
Chopped fresh chives, for garnish
Swirl of black truffle oil, for garnish

Directions:

1. Put the potatoes into a large pot, add 2 tablespoons of Kosher salt and cover with cold water.

2. Bring the potatoes to a boil over medium-high heat and cook until the potatoes are fork-tender, or for about 20 minutes.

3. Mash the potatoes using a potato ricer or a potato masher. Add the butter, and mash. Add the truffle salt, and mix again. Add the half-and-half, and stir until smooth and evenly combined.

4. Taste the potatoes, then season well with additional Kosher salt and pepper. Add additional truffle salt, per your preference. We tend to season lightly with truffle salt, as the flavor permeates the potatoes and a subtle flavor seems to accent them best.

5. Garnish the finished potatoes with chopped fresh chives and a swirl of truffle oil, if desired.

Tagliatelle Pasta with Roasted Delicata Squash and Crispy Sage Sauce

Lia Soneson

This beautiful fall pasta dish celebrates the often overlooked delicata squash. Creamy and sweet, this green and yellow striated squash is roasted until golden brown, then tossed with toothy tagliatelle pasta in a nutty, brown butter sauce. Topped with toasted walnuts, crispy sage, and a healthy dose of Parmesan — dinner is deliciously served!


Tagliatelle Pasta with Roasted Delicata Squash and Crispy Sage Sauce
Serves 4 - 6

Ingredients:

1 cup walnut halves
1 large, (or two small) delicata squash
4 cloves garlic, thinly sliced
2 shallots, peeled, halved, and thinly sliced
2 tablespoons olive oil
1/2 teaspoon Kosher salt
1/2 teaspoon black pepper
1/4 teaspoon crushed red pepper
1/2 cup butter
15-20 sage leaves, washed and patted dry
1/2 cup vegetable stock
2 tablespoons dry white wine
1 tablespoon fresh lemon juice
1 cup finely grated Parmesan cheese
1 lb tagliatelle pasta

Directions:

1. Preheat the oven to 350°F. Arrange the walnut halves in a single layer on a rimmed baking sheet and bake until toasted, about 5-8 minutes. Stir halfway through to ensure even cooking. Once browned and fragrant, remove walnuts from the ovenand set aside to cool.

TIP: Delicata squash does not have to be peeled, and is much easier to cut than say, wrangling a butternut squash. This makes this dish a quick-and-easy weeknight pasta! The striated green and yellow skin is tender and offers a textural depth to the dish, while the squash’s flavor is slightly sweet and nutty.

2. Increase the oven temperature to 425 degrees F. Scrub the delicata squash and cut off the stem and root ends. Halve the squash lengthwise and scrape out the seeds. Cut the squash into 1/2" wide pieces, leaving the peel on.

3. In a medium bowl, add the squash, garlic, and shallots. Toss with the olive oil, Kosher salt, black pepper, and crushed red pepper until coated. Evenly spread the mixture on a rimmed baking sheet and roast for 20 minutes, or until the squash becomes tender and begins to brown. Remove from the oven and set aside.

4. In a Dutch oven over medium-low heat, add the butter and stir constantly until it begins to turn from yellow to light brown. Add the sage leaves and cook in the butter until crisp, using tongs to individually turn each leaf so that both sides are cooked. Once crispy, remove the sage leaves from the butter and place on a paper towel-lined plate. Continue to cook the butter until it is brown and has a rich, nutty aroma. Add the vegetable stock and dry white wine. Continue to cook on a low simmer until the sauce has reduced by almost half. Remove the Dutch oven from heat and set aside.

5. Boil the pasta according to the directions and cook until al dente. Drain the pasta reserving some of the pasta water. Immediately toss the pasta in the brown butter sauce. Add the lemon juice and reserved pasta water 1/4 cup at a time as needed to coat the pasta. 6. Add in the delicata squash, garlic, shallots, and Parmesan cheese, and top with the crispy sage and walnuts. Taste and add additional salt and pepper as needed. Serve immediately.

Saffron & Butternut Squash Risotto with Crispy Prosciutto

Lia Soneson

Creamy, and satisfying, this saffron and butternut squash risotto is topped off with crispy prosciutto and toasted pine nuts creating a dish that captures the essence of autumn flavors! The risotto becomes extra rich and creamy with the addition of roasted and pureed butternut squash.


Saffron & Butternut Squash Risotto with Crispy Prosciutto
Serves 6

Ingredients:

1 medium butternut squash, diced into 3/8" cubes
4 tablespoons olive oil, divided
1 onion, finely diced
4 cloves garlic, minced
4 tablespoons butter, divided
2 cups arborio rice
1 cup dry white wine
4-5 cups chicken broth
1/2 teaspoon of saffron, or about 8 threads
1/2 cup parmesan cheese, grated
Kosher salt and pepper to taste

Garnish:

1-2 oz prosciutto, cooked in a pan until crispy
Parmesan cheese

Risotto Directions:

1. Preheat the oven to 400 degrees F. Place the diced butternut squash in a single layer on a large roasting pan. Drizzle with 2 tablespoons of olive oil. Sprinkle the squash with Kosher salt and pepper and roast for about 20-25 minutes or until fork tender. Stir and toss the squash halfway through the roasting process. Remove half of the squash and puree with a small food processor or immersion hand blender. Reserve the other half as cubes to be added to the finished risotto.

2. In a large Dutch oven over medium-high heat, sauté the onions and garlic in a blend of 2 tablespoons of butter and 2 tablespoons of olive oil until translucent. Add the arborio rice and stir until coated. Then, add the white wine and continue to stir until it is fully absorbed.

3. Meanwhile, in a separate soup pot, bring the broth to a simmer and separate one cup of broth into a separate bowl or measuring cup. Add the saffron to the reserved broth to infuse flavor to the broth. Set aside.

4. Once the wine is absorbed into the rice, slowly add 1-2 ladles of broth to the pot of rice, starting with the saffron-infused broth; bring to a low simmer. Keep simmering and slowly add ladles of broth (one ladle at a time). Stir continuously, until the broth becomes absorbed.

5. While the risotto cooks, prepare the crispy prosciutto. In a large skillet or braiser, heat a tablespoon of olive oil and cook the prosciutto until crispy. Remove the prosciutto once crispy and set aside on a paper towel-lined plate.

6. Continue cooking the risotto. Season with Kosher salt and pepper while stirring and adding the broth. Taste test the risotto often to ensure adequate amounts of salt and pepper are used, according to your taste. When the risotto is al dente, add 1 more ladle of the broth, stir, and turn the heat down to low.

7. Add the roasted, pureed squash and stir. Then, add the cubes of roasted squash. For a silky finish, stir in the remaining 2 tablespoons of butter and 1/2 cup of Parmesan cheese.

8. Serve hot. Garnish with the crispy prosciutto.

Easy-Cheesy Calzones

Lia Soneson

Perfectly portable and easy to assemble, calzones are a fun variation on a classic pizza night. Savory sautéed onions, mushrooms, and peppers are nestled alongside fresh ricotta and mozzarella, then folded inside a pillowy dough. These pockets are served alongside a simple, piquant homemade red sauce. Buon appetito!


Easy-Cheesy Calzones
Makes 4 calzones

Red Sauce Ingredients:
1 can (28 oz) whole tomatoes
4 cloves garlic
1/2 teaspoon Kosher salt
1/2 teaspoon sugar
1/2 teaspoon balsamic vinegar

Filling Ingredients:
1 tablespoon olive oil
1/2 small yellow onion, diced
3 cloves garlic, minced
1 cup crimini mushrooms, sliced
1/2 green bell pepper, diced
1/2 teaspoon Kosher salt1
/4 teaspoon black pepper
1/2 cup whole milk ricotta
1-1/4 cups whole milk mozzarella cheese, grated

Dough Ingredients:
1-1/2 cups warm water (110°F)
1 packet of fast-acting yeast
3.5 - 4 cups all-purpose flour
1 teaspoon sugar
1 teaspoon Kosher salt
2 tablespoons olive oil
1 tablespoons cornmeal, (for sprinkling)
1 egg, whisked (for the egg wash)
Grated parmesan, for garnish
Basil, for garnish

Directions:

1. Make the sauce. In a blender or food processor, combine all of the ingredients together and blend until smooth. Set aside until ready to ladle the sauce in a thin layer directly onto the calzone dough.

2. Cook the filling. In a large sauté pan over medium heat, heat the olive oil. Add the onion and garlic and cook until fragrant, or for about 2 minutes. Add the mushrooms, bell peppers, Kosher salt, and pepper. Cook until all of the ingredients are soft and aromatic, about 10-15 minutes. Remove from the heat and set aside until ready to assemble the calzones.

3. Prepare the dough. Measure and heat the water to 110°F. Sprinkle the yeast on top. Allow the yeast to stand undisturbed for a few minutes. It's ready to use when it looks slightly foamy on top.

4. While the yeast is dissolving and activating, whisk 3.5 cups of the flour, salt, and sugar together in a large bowl.

5. Add the olive oil to the yeast and water. Pour into the flour mixture. Using a large mixing spoon (and then your hands) stir to combine the mixture until a sticky dough forms and all of the ingredients are mixed.

6. Cover the dough with a kitchen towel and let it double in size, about 30 minutes.

7. Transfer the dough to a floured surface and divide it into 4 even pieces. Knead each section of dough individually, adding a little bit of the remaining flour to the dough and the working surface as needed until the dough balls are smooth, and not too sticky. Place the dough balls under a kitchen towel and let them rest for another 15 minutes.

8. Preheat the oven to 450°F. Prepare a parchment-lined baking sheet with a generous sprinkle of cornmeal (this will help prevent the calzones from sticking).

9. Select one ball of dough and place it on a lightly floured surface. With floured hands, begin to flatten the ball into a round disc, about 8" in diameter, starting from the center and working out to form the crust.

10. Assemble the calzones! Once the dough is formed, spoon about 2 tablespoons of the red sauce on one side, leaving 1" open on the edge. Next, add the sautéed vegetables and cheeses over the red sauce. (Remember to avoid overloading the fillings -- this could make your calzones burst during baking.) Brush the edges with a small amount of water, and then fold the dough over the filling to create a semi-circle. Press the edges with your fingers to seal, then crimp the edges with your fingers to secure.

11. Repeat this process with the remaining dough balls to create 4 individual calzones. Place the calzones on two parchment-lined baking sheets and brush with an egg wash. Use a sharp knife or sharp kitchen shears to slice 3 vent holes in the top of each calzone to allow steam to release. Bake for 15-18 minutes or until the calzones are cooked through and the crust is golden brown.

12. Sprinkle with parmesan and basil and serve with the remaining red sauce for dipping.

Grilled Nectarine and Chicken Salad

Lia Soneson

 
GrilledSalad_v3_01.jpg

Try this truly satisfying summer salad! Grilled chicken and nectarine halves perfectly complement the crispy crunch of fresh greens. Creamy goat cheese, bright blueberries, and a homemade, herbed buttermilk dressing seal the deal for this wonderful meal!


Grilled Nectarine and Chicken Salad with an Herbed Buttermilk Dressing
Serves 4

Salad Ingredients:
2 large chicken breasts, about 1 lb boneless, thinly sliced (or 4 thinly-cut chicken breasts)
4 nectarines, halved and grilled
6 oz spring mix of spinach and arugula
4 oz goat cheese, crumbled into bite-sized pieces
1 cup blueberries, washed
1/4 small red onion, thinly sliced

Chicken Marinade:
1 teaspoon Kosher salt
1/2 teaspoon black pepper
1/2 teaspoon garlic powder
1/2 teaspoon dried basil
1/2 teaspoon dried oregano
1/4 teaspoon paprika
2 tablespoons olive oil
2 tablespoons fresh lemon juice

Herbed Buttermilk Dressing:
1 clove garlic, grated
1 tablespoon fresh parsley, minced
1 tablespoon fresh basil, minced (8-10 leaves)
1 tablespoon chives, sliced
1/2 cup buttermilk
1/2 cup Greek yogurt
2 tablespoons olive oil
2 tablespoons lemon juice
1 tablespoon white wine vinegar
1 teaspoon Kosher salt
1/2 teaspoon black pepper
1/4 teaspoon garlic powder
1 teaspoon sugar

Directions:
1. Prepare the chicken breasts by thinly slicing in half to make thinner breasts for more flavor and faster grilling. Marinate the chicken in a large bowl. Rub the chicken on all sides with Kosher salt, pepper, garlic powder, basil, oregano, and paprika. Drizzle with olive oil and lemon juice. Cover and refrigerate the chicken; marinate for 30 minutes or up to 1 hour.

2. Prepare the herbed buttermilk dressing. Peel and grate the garlic using a fine grater. Wash the parsley, basil, and chives and chop finely. In a medium-sized glass bowl, whisk the buttermilk and Greek yogurt together until well combined. Add the olive oil, lemon juice, Kosher salt, pepper, garlic powder, and sugar; mix well. Whisk in the grated garlic and chopped herbs until evenly incorporated.

3. Prepare the nectarines for grilling by washing, and slicing in half. Carefully remove the pit with a paring knife. Brush each half with olive oil.

4. Fire up the grill! When using a gas grill, prepare half of the grill with high heat while keeping the other half on low heat -- that is, use a direct/indirect set-up. Add the chicken to the cooler side of the well-oiled grill and close the lid. After 4-5 minutes, turn once and cook an additional 4-5 minutes. Continue to grill and flip, as needed, until the thickest part of the breast reaches 160°F. After removing the chicken from the grill, the heat in the chicken breast will continue to rise until it hits the food-safe temperature of 165°F. Let the chicken rest for 5 minutes, then cut into slices.

5. Grill the nectarine halves flesh-side down over medium-high heat for 3 to 4 minutes or until grill marks appear.

6. Assemble the salad! Layer the greens and red onion with a drizzle of the herbed buttermilk dressing. Top the salad with the grilled chicken slices, grilled nectarine halves, goat cheese crumbles, and blueberries. Garnish with fresh chives, if desired.


Fresh Tomato Tart

Lia Soneson

 
Tomato_Tart_v6_01.jpg

Peak tomato season is upon us! A tomato tart is a unique and delicious way to showcase this summertime star. This dish features a Parmesan cheese crust layered with whipped ricotta and finished with slices of heirloom tomatoes and fresh basil. Enjoy this tomato tart with a simple side salad for a delightful lunch or dinner!


Fresh Tomato Tart
Makes one 9-inch square tart

Parmesan Crust Ingredients:
1-1/4 cups flour
1/2 teaspoon Kosher salt
1/4 teaspoon freshly ground pepper
1 cup Parmesan cheese, grated
1/2 cup cold, salted butter, cut into cubes
1-3 tablespoons ice water

Whipped Ricotta Filling Ingredients:
8 oz fresh ricotta cheese
1 tablespoon olive oil
1 teaspoon fresh lemon juice
1 teaspoon lemon zest
1/4 teaspoon Kosher salt

Topping Ingredients:
3 large heirloom tomatoes, sliced
Salt for tomatoes
Basil, chiffonade cut for garnish
Lemon zest, for garnish
Reduced balsamic vinegar, drizzled for garnish
Kosher or flake salt for garnish

Directions:

1. Prepare the crust. Using a food processor, pulse the flour, salt, pepper, and Parmesan cheese together until combined. Add 1/2 of the cubed butter and pulse until the texture is as coarse as cornmeal. Add the remain- ing butter and pulse a few times leaving some pieces the size of small peas. Slowly drizzle the water in one tablespoon at a time, and pulse until the dough forms. Avoid adding too much water.

2. Pat the dough into a disc form and wrap with plastic wrap. Refrigerate for at least one hour.

3. Meanwhile, prepare the whipped ricotta filling. In a food processor or high-powered blender, whip the ricotta with the olive oil, fresh lemon juice, lemon zest, and salt until a very smooth texture is formed.

4. Prepare the topping ingredients. Slice the tomatoes into 1/4”-thick slices, and place on a paper towel-lined sheet pan. Sprinkle the slices with Kosher salt and let them rest for a few minutes to release excess juices. Slice the basil into a chiffonade cut for a garnish. Zest a lemon to use as a garnish, as well.

5. Preheat the oven to 375°F. Roll out the crust on a flour-dusted work surface. Place the crust in a greased tart pan and trim the edges. Place pie weights inside the tart crust and bake for 15-20 minutes. Remove the pie weights and continue baking an additional 15-20 minutes or until the crust springs back when touched, and has turned a light golden hue. Allow the crust to cool completely on a cooling rack.

6. Assemble the tart once the crust has cooled completely. Spread the whipped ricotta on the baked crust. Top the ricotta layer with the tomato slices. Garnish with the basil, lemon zest, a pinch of salt, and a drizzle of reduced balsamic vinegar. Serve immediately. Enjoy with a simple side salad, if desired.


Crab Cakes

Lia Soneson

 
Crab-Cakes_v2_01.jpg

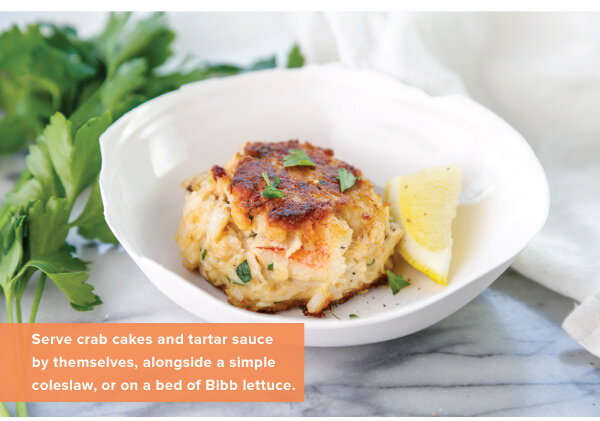
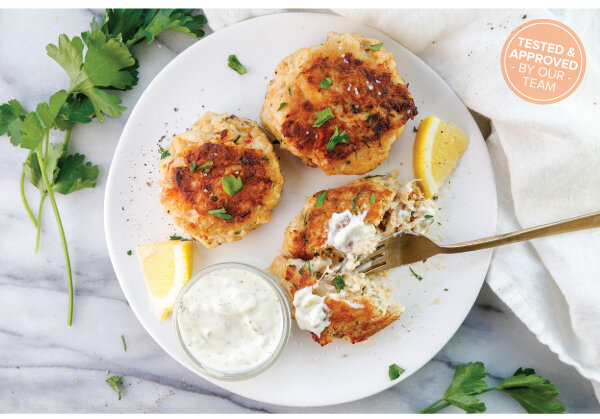
Crab meat can be intimidating for those of us not lucky enough to live in areas where crab is plentiful, but don't be afraid! Crab meat in a can tastes fantastic and saves the work of breaking down whole crabs – plus, it's is easy to find! Our Crab Cakes with Lemon Dill Tartar Sauce recipe is perfect for getting you started. Large chunks of luscious crab meat are carefully blended with crackers, spices, mayo, and egg. Lightly fried, these cakes are crisp on the outside, and tender on the inside. Serve them with our lemon dill tartar sauce on a bed of Bibb lettuce, or alongside a simple coleslaw.

Crab Cakes with Lemon Dill Tartar Sauce
Makes 8 patties

Crab Cake Ingredients:
1 lb Dungeness or jumbo lump crab meat
1 cup finely crushed saltine crackers, (about 20 crackers)
1/3 cup mayonnaise
1 large egg, beaten
2 teaspoons Dijon mustard
1 tablespoon Worcestershire sauce
1/2 teaspoon celery salt
1/8 teaspoon black pepper
1/2 teaspoon paprika
1/4 teaspoon Kosher salt
1 teaspoon lemon zest
1/2 teaspoon tabasco sauce
2 tablespoons fresh parsley, finely chopped
1/4 cup vegetable oil, for frying
Lemon wedges, for serving

Lemon Dill Tartar Sauce Ingredients:
1/2 cup mayonnaise
1 tablespoon dill pickle relish
1/2 tablespoon minced shallot
1 tablespoon lemon juice
1/2 teaspoon dill

Directions:
1. In a medium bowl pick through the crab meat, inspecting and removing any shells if necessary.

2. Use a food processor to break down the saltine crackers until they create a fine crumb. Lightly toss the crab meat with the crumbs.

3. In a small bowl, whisk together the mayonnaise, egg, Dijon mustard, Worcestershire sauce, celery salt, black pepper, paprika, kosher salt, lemon zest, tabasco sauce and parsley until combined.

4. Gently fold in the mayo mixture with the crab meat, trying to keep the large lumps of meat as intact as possible.

5. Carefully form the crab mixture into patties roughly 4-5" diameter and 1" thick. Be careful not to pack them too firmly. Place the cakes on a rimmed tray lined with wax paper. Cover, and refrigerate for at least 1 hour.

6. Meanwhile, make the tartar sauce by whisking together all of the tartar sauce ingredients. Cover and refrigerate.

7. Once the crab patties have chilled, remove from the refrigerator. In a large skillet, heat the vegetable oil until it begins to shimmer. Working in multiple batches, add the individual crab cakes to the skillet, being careful to not crowd the pan. Cook the cakes over medium heat until the patties are golden brown and cooked through, about 4-5 minutes on each side. Repeat until all cakes have been cooked. Serve the crab cakes immediately with lemon wedges and tartar sauce.


Sweet Corn Carbonara

Lia Soneson

 
Corn_Carbonara_v2_01.jpg

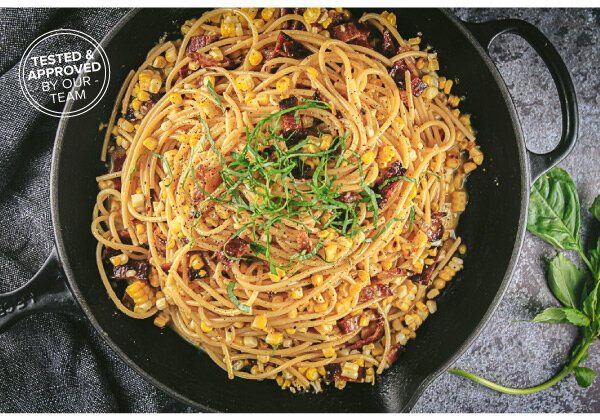
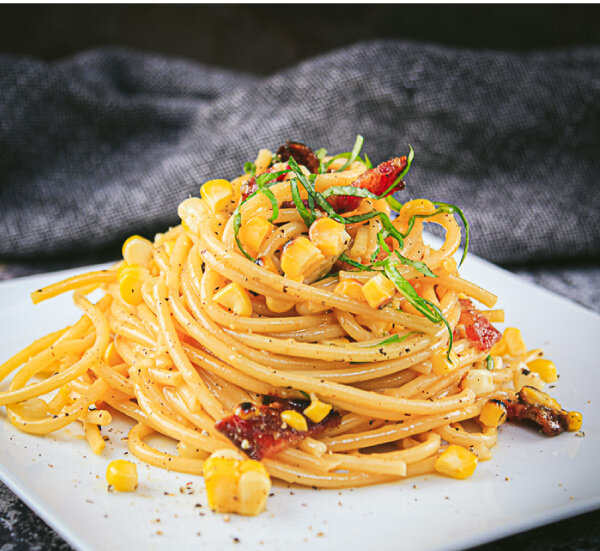
We know that a classic pasta carbonara, made with very distinct ingredients, is nearly a sacred dish in Rome. However, we couldn't help riffing on the original with a summery flare! Our recipe substitutes bacon for traditional guanciale and features the addition of summer sweet corn, and basil fresh from the garden. We hope you enjoy this easy and delicious summer dinner as much as we did!

Bucatini alla Carbonara with Grilled Corn, Bacon, & Basil
Serves 4

Ingredients:
12 oz bucatini
6 slices thick-cut bacon
4 ears sweet corn, grilled and kernels removed from the cob
1/3 cup pecorino romano, finely grated
2/3 cup parmesan, finely grated
2 whole eggs
3 egg yolks
10 leaves fresh basil, chiffonade cut
1/2 teaspoon freshly ground pepper

Directions:
1. Preheat the grill and grill the corn cobs on direct heat, turning until slightly charred about 3-4 minutes per side. Once the corn has cooled, remove the kernels from the cob using a corn stripping tool. Wash and thinly chiffonade the basil.

2. Meanwhile, cook the bacon in a large skillet. Once the bacon has cooked, let it cool on a paper towel-lined plate. Once it's cooled, slice or crumble into bite-sized pieces. Discard the excess bacon grease, leaving about 1 tablespoon in the skillet.

3. In a medium bowl, combine the whole eggs and the egg yolks. Whisk together. Mix in the finely grated pecorino romano, parmesan cheese, and freshly ground pepper to the eggs. Whisk the mixture until well-combined and set aside.

4. Cook the bucatini according to the package instructions in a large pot of well-salted water until al dente. Reserve at least 1 cup of pasta water for finishing the sauce.

5. In the large skillet, immediately mix the hot pasta with the egg mixture and about 1/2 to 1 cup of the reserved pasta water. Stir the pasta together with tongs until the noodles are coated and a silky sauce is formed.

6. Add the cooked bacon and grilled corn to the coated noodles. Stir until combined. Serve immediately with a garnish of basil and extra cheese, as desired. Enjoy!


Mediterranean Party Platter

Lia Soneson

 
Mediterranean-Party-Platter_V2_01.jpg

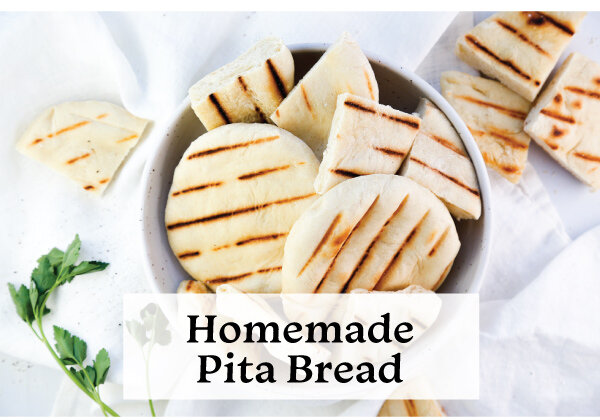
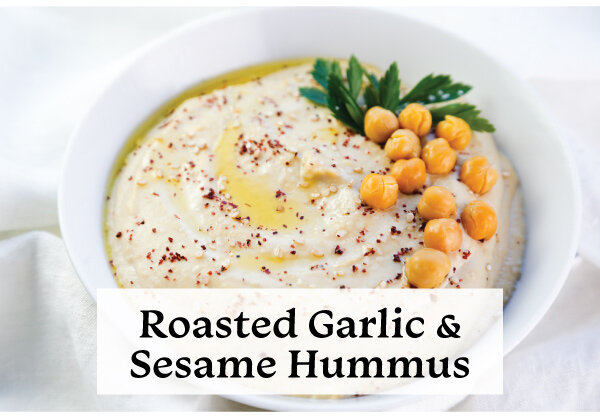
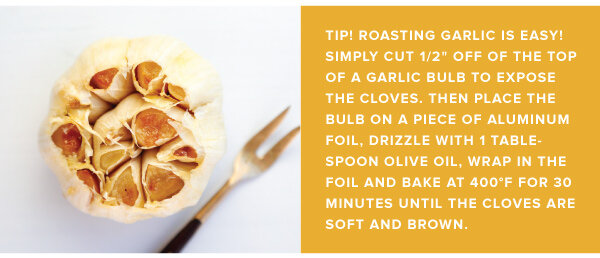
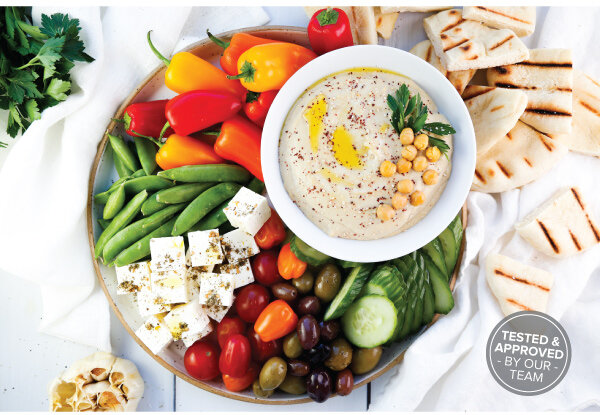
This Mediterranean party platter is all you need for a delightful dining experience, al fresco, this summer. Try our fail-proof tip for the creamiest hummus that features an extra flavor boost from roasted garlic cloves and sesame oil. Add homemade grilled pita bread and fresh veggies for a very tasty, shared summertime table.

Mediterranean Party Platter

Homemade Pita Bread:
1 cup warm water
1 packet active yeast, or 2-1/4 teaspoons
2-1/2 to 3 cups flour
1 teaspoon Kosher salt
1/2 teaspoon sugar
2 tablespoons olive oil, plus extra for oiling bowl

Directions:
1. In the bowl of a stand mixer, pour in the warm water and sprinkle the yeast on top. Allow the yeast to hydrate and bloom by leaving undisturbed for 2-3 minutes.

2. Add one cup of flour and the sugar to the yeast and water. Mix on low speed with the paddle attachment for about 1 minute or until evenly combined. Let the beginning batter stand for about 20 minutes for further yeast development.

3. After this rest, many bubbles will have formed. Add the salt and olive oil to the batter. On low speed, slowly add an additional 1-1/2 cups of the flour.

4. Continue to mix and add 2-4 tablespoons of additional flour until a soft dough ball has formed. The dough should be "springy," and not too sticky.

5. Remove the dough from the mixer and knead on a lightly floured surface until the dough forms a nice, well-rounded ball.

6. Clean the mixing bowl, then drizzle a little olive oil and coat the inside of the bowl. Place the dough into the bowl, turn it to coat all surfaces with the olive oil. Cover, and let rise for 2 hours or until doubled in size.

7. Remove the risen dough from the bowl, and pat into a flat disk. Divide the disk into 8 equal sections with a dough cutter or large chef's knife.

8. Form each section into its own small ball by folding the dough until a neat ball has been formed.

9. Place the 8 individual balls on a lightly floured surface and cover with plastic wrap for 30 minutes and let rise again.

10. Once the individual dough balls have risen, remove a single ball and gently roll into a 8” circle, or until the dough is about 1/4” thick.

11. Preheat a well-oiled cast-iron grill pan on the stovetop over medium-high heat.

12. Place the rolled out dough pieces in the heated pan, and watch it puff up. Turn until each side is slightly golden, about 3 minutes per side. Cut into wedges and serve with roasted garlic hummus.

Roasted Garlic and Sesame Hummus:
1 can (15 oz) chickpeas, rinsed and drained
3/4 teaspoon baking soda
1/4 cup, plus 1 tablespoon fresh lemon juice (about 1 large lemon)
1/4 cup, olive oil
1/2 cup tahini
1/2 teaspoon Kosher salt
1/2 teaspoon toasted sesame oil
1 small clove fresh garlic, finely minced
5 cloves roasted garlic

Garnish:
Sumac
Toasted Sesame seeds
Fresh parsley, chopped
Olive oil, for drizzling

Directions:
1. In a medium pot, add the chickpeas and baking soda. Cover the chickpeas with an 2-3 inches of water and cook over high heat, bringing the water to a rolling boil. Slightly reduce the heat and keep the chickpeas cooking over a low boil for 20-30 minutes until they are very soft and their skins are falling off. Strain and rinse chickpeas in cold water, shifting and turning them to risen off any baking soda residue. Continue to rinse under cold water until chickpeas are back to room temperature.

2. In a large food processor blend the cooked chickpeas until smooth.

3. Drizzle in the lemon juice, olive oil, tahini, Kosher salt, sesame oil, garlic, and roasted garlic. Blend until smooth, scraping down the sides as needed.

4. Garnish sumac, toasted sesame seeds, fresh parsley, and a healthy splash of olive oil. Serve with pita bread, olives, cucumbers, tomatoes, peppers, snap peas, and marinated feta cheese. Store leftover hummus in an airtight container in the refrigerator for up to 5 days.


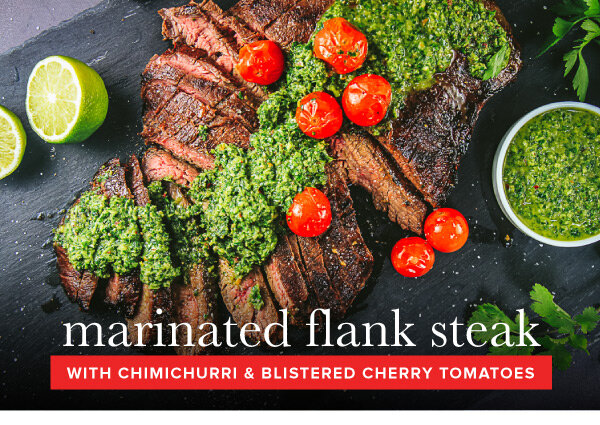
Marinated Flank Steak

Lia Soneson

 
Steak_v2_01.jpg

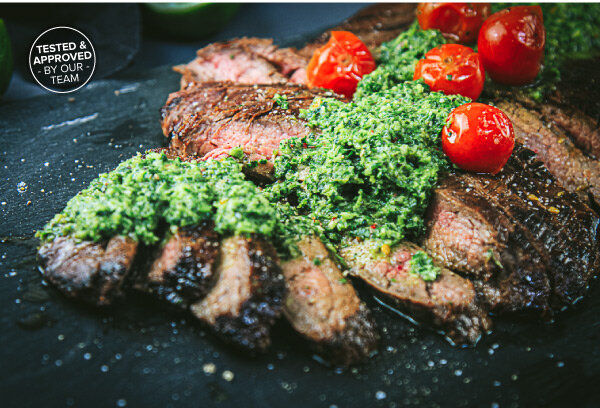
Treat Dad to delicious steak from the grill! Perfectly grilled meat is a great way to anchor a celebration meal! Our version of tender flank steak is filled with savory flavors from the marinade and grilling process itself. The steak is further enhanced with the fresh herbal flavors of a tantalizing chimichurri sauce, and the bursting freshness of blistered cherry tomatoes.

Marinated Flank Steak With Chimichurri & Blistered Cherry Tomatoes
Serves 4

Ingredients:
1 (2 lb) flank steak
8 oz cherry tomatoes

For the Marinade:
2 tablespoons olive oil
2 teaspoons Worcestershire sauce
1/4 cup soy sauce
1 small lime, juiced (about 1/8 cup)
1 tablespoon honey
1 teaspoon Kosher salt
1/2 teaspoon freshly ground pepper
1 teaspoon chili powder
1/2 teaspoon garlic powder

For the Chimichurri:
1 cup fresh flat-leaf parsley (stems are ok)
1 cup fresh cilantro (stems are ok)
2 garlic cloves, peeled
1 small shallot, halved (about 2 tablespoons)
1 small jalapeño pepper, quartered, seeds removed
1/2 cup olive oil
1/4 cup red wine vinegar
3 tablespoons fresh lime juice
3/4 teaspoon dried crushed red pepper
1/2 teaspoon Kosher salt
1/2 teaspoon black pepper

Directions:
1. WHISK THE MARINADE ingredients together until combined, and then pour over the flank steak. Chill and marinate in a sealed container or bag for 1 hour, or up to overnight. Allow the steak to come to room temperature for about 20 minutes prior to grilling.

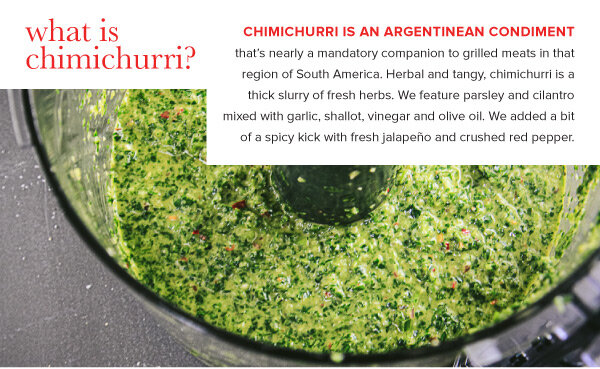
2. PREPARE THE CHIMICHURRI SAUCE. In a powerful blender or food processor, combine all of the chimichurri ingredients and pulse until well combined but still with some texture to the sauce. Set aside until ready to serve with the cooked steak.

3. GRILL THE STEAK! Fire up the grill, preheat the grill to high. Place the steak on the grill, and cook for 3-4 minutes, flip once, and cook for another 3-4 minutes. Continue grilling and flipping until the internal temperature reaches 135°F for medium-rare.

4. REMOVE THE STEAK FROM THE GRILL, and let it rest for 10 minutes to let the juices set and reabsorb.

5. WHILE THE STEAK RESTS, PREPARE THE BLISTERED CHERRY TOMATOES. Toss the tomatoes in 1 tablespoon of olive oil. In a cast iron skillet on the stovetop or in a grill basket on the grill, cook the cherry tomatoes. Sear and toss until the tomatoes begin to blister, and just begin to crack open. Remove from the heat.

6. When ready to serve, cut the steak into thin strips slicing against the grain.

7. Serve with a generous spoonful of chimichurri sauce and several blistered cherry tomatoes.


Spicy Tuna Bowl

Lia Soneson

 
Spicy-Tuna-Bowl_v2_01.jpg

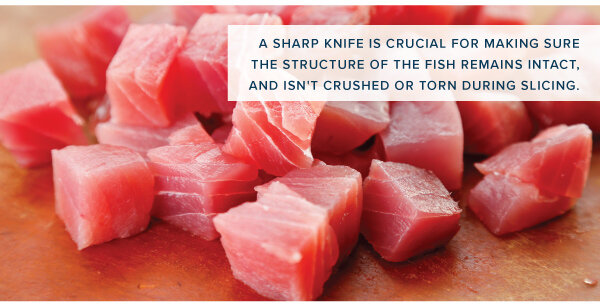
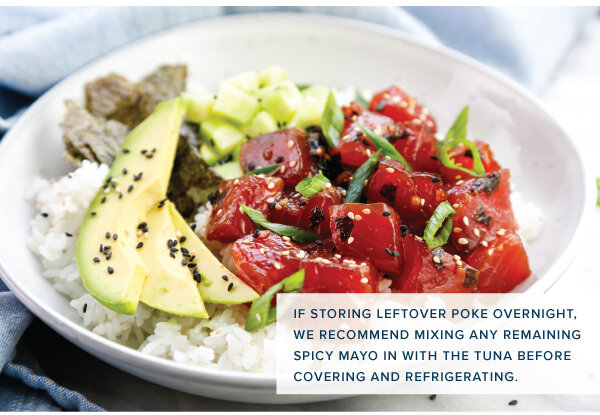
We love food that tastes good and looks good too! Poke (pronounced poh-KAY) means 'to cut crosswise into pieces' — so sharpen your knives! Poke is a common Hawaiian dish, brought to the islands by early Polynesian settlers. This recipe highlights the fresh flavors of jewel-like raw ahi tuna. Also known as yellowfin tuna, the freshness and quality of the fish are key to this dish, so make sure to find high-quality, sushi-grade tuna, and plan to prepare the poke bowls the same day you purchase the fish for maximum flavor!

Spicy Tuna Poke Bowl
Makes 2 bowls

Tuna Marinade Ingredients:
1 teaspoon minced shallot
2 tablespoons soy sauce
1 teaspoon mirin
1/4 teaspoon cayenne
1 teaspoon crushed seaweed (nori)
1 teaspoon sesame oil
1/2 pound sushi grade ahi tuna, cut into 1/2" cubes

Sushi Rice Ingredients:
1 cup white sushi rice
1 cup water
1 tablespoon rice vinegar
1 teaspoon white sugar
1 teaspoon salt

Spicy Mayo Ingredients:
3 tablespoons full fat mayo
2 tablespoons sriracha
1 teaspoon freshly squeezed lemon juice

Bowl Ingredients:
1/2 English cucumber, peeled and diced into 1/2" cubes
1 avocado, sliced
3 green onions, cut on the bias
1 teaspoon black sesame seeds
1 teaspoon sesame seeds
Seaweed (nori), cut into strips
Pickled ginger (optional)

Directions:
1. Combine all of the marinade ingredients except for the tuna in a large bowl. Whisk to incorporate. Add the cubed tuna to the marinade and gently toss the fish in the marinade to coat. Cover and refrigerate for 60 minutes.

2. Meanwhile, prepare the rice. Rinse the rice in a colander until the milky water runs clear. Combine rice and water in a medium saucepan, cover, and bring to a boil. Once boiling, reduce the heat to low and cook for an additional 15 minutes, until the rice is soft and fluy and the water has been absorbed. Remove from heat and cool until the rice is warm, but not hot.
3. While the rice is cooling, combine the vinegar, sugar, and salt in a small saucepan and bring to a simmer until the salt and sugar have dissolved, about 2 minutes. Remove from heat and carefully stir the vinegar into the rice.

4. Combine the spicy mayo ingredients in a bowl, and whisk to incorporate.

5. Assemble the poke bowls by layering the rice on the bottom of a shallow bowl, then adding a portion of marinated tuna next to the cucumber, avocado, green onion, and nori. Drizzle with the spicy mayo, sprinkle with the sesame seeds, and serve with pickled ginger if desired.


Grilled Chicken Sandwiches

Lia Soneson

 
ChixSandwiches_v2_01.jpg

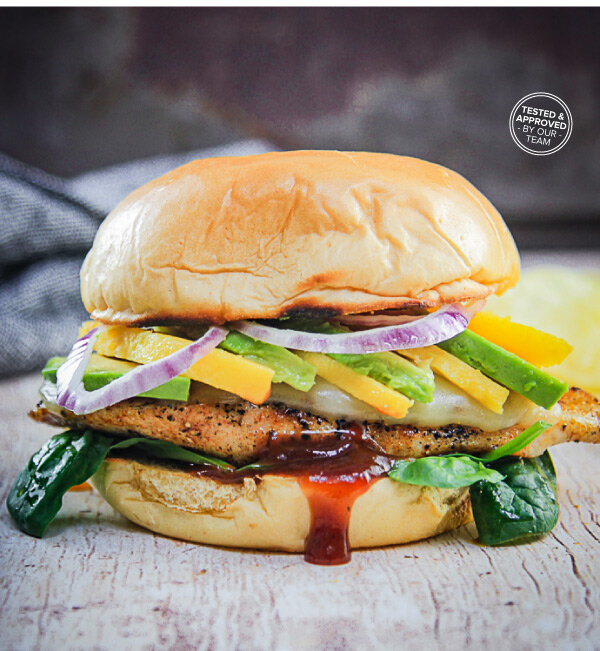
Enjoy a fully loaded grilled chicken sandwich! Perfectly grilled, juicy chicken is layered with elements of sweet, salty, tangy, and savory that will delight the senses. You won't believe how easily it comes together!

Grilled Chicken Sandwiches
Serves 4

Chicken and the Rub:
2 boneless chicken breasts, sliced in half
2 tablespoons olive oil
1/2 teaspoon Kosher salt
1/2 teaspoon fresh ground pepper
1/2 teaspoon ground cumin
1/4 teaspoon garlic powder
1/4 teaspoon paprika
1 teaspoon sugar

Sandwich Ingredients:
4 buns
4 tablespoons butter for buns
4 slices pepper jack cheese
1 avocado, sliced
1 ripe mango, sliced
4 ounces spinach
1/4 red onion, thinly sliced
BBQ sauce

Directions:
1. In a large bowl drizzle the chicken with the olive oil, and then rub with the spices (Kosher salt, pepper, cumin, garlic powder, paprika, and sugar) until well-coated on all sides. Preheat the grill.

2. Butter the buns on the inside of both the top and bottom, and prepare to grill by placing on a plate or platter to take out to the grill. Place the cheese on the side of the same plate, too.

3. Prepare the toppings for the sandwich. Halve, de-seed, peel, and slice the mango. Halve, pit, peel, and slice the avocado. Wash and spin dry the spinach leaves; remove stems as needed. Thinly slice the red onion.

4. Grill the chicken breast for 4-5 minutes and flip with grill tongs or metal spatula. Once the chicken breasts are almost done, place the cheese on top of each chicken breast, and allow the cheese to melt. Remove from the grill once the thickest part of the breast reaches 165 degrees F. Let the grilled breasts rest on a clean platter while grilling the buns.
5. Toast the buns on the grill until just golden brown.

6. Layer the toasted bun with a smear of BBQ Sauce, then add a layer of spinach leaves. Place the grilled chicken breast with melted cheese on top of the spinach. Add slices of avocado and mango, and top with slices of red onion. Drizzle more BBQ sauce on top. Finish the sandwich by capping it all with the top grilled bun. Enjoy!


Hot Dog Bar

Lia Soneson

 
HotDog_Bar_v2_01.jpg

A hot dog is a fine thing, BUT, a bacon-wrapped hot dog paired with a packed hot dog bar is an experience that’s anything but ordinary. Fire up the grill! There’s an entire summer season ahead — and you’ve got some serious eating to do!

Summertime Hot Dog Bar
Serves 4

Basic Ingredients:
8 hot dog buns
8 all beef hot dogs
8 pieces thin-sliced bacon
16 toothpicks, (soaked for 30 minutes)

Optional Condiments:
Ketchup
Yellow Mustard
Spicy Brown Mustard
Cream Cheese
BBQ Sauce Hot Sauce

Optional Toppings:
Dill or Sweet Relish Onions, caramelized
Spicy Marinated Peppers
Jalapeño Peppers
Pineapple Spears
Red Onion, diced
Baked Beans or Chili Beans
Cheddar Cheese
Pickle Spears

Directions:
1. Soak toothpicks in water for 30 minutes before grilling.

2. Wrap the hot dogs with a slice of thin-sliced bacon. Secure the bacon on each end with a soaked toothpick.

3. Grill the bacon-wrapped hot dogs on a well-oiled grill over medium heat. Turn the dogs as needed to cook the bacon until it’s crispy on all sides. The bacon will take longer to grill than a plain dog, so plan on watching and turning the dogs carefully until the bacon is cooked evenly on all sides.

4. Once you’ve flipped the hot dogs and the bacon has cooked on the top and bottom, the bacon should be secure enough around the hot dog to remove the toothpicks. Carefully remove the toothpicks and grill the other two sides until the bacon is fully crispy on all sides. Get creative with the toppings! Two of our favorite hot dog toppings are caramelized onions paired with a thick stripe of cream cheese. From there, go with the other condiments as desired. The cream cheese, not a common hot dog addition, is nicely decadent -- try it, you might love it, too!

Try one of these tasty combos, or make up your own signature hot dog:
West Coast Vibes: Cream Cheese + Caramelized Onions + Spicy Brown Mustard + Pickled Hot Peppers
Cowboy Dog: Bacon-wrapped dog with Baked Beans + Cheddar Cheese + Mustard + Red Onions
Island Style: Pineapple Spear + Cilantro + Red Onion + BBQ Sauce
Taco Time: Tomatoes + Cilantro + Cheddar Cheese + Pickled Jalapeño Slices + Hot Sauce
Classic Dog: Relish + Ketchup + Mustard