Contact Us

Use the form on the right to contact us.

You can edit the text in this area, and change where the contact form on the right submits to, by entering edit mode using the modes on the bottom right. 

2210 Haines Avenue
Rapid City, SD, 57701
United States

605-341-5044

Someone's In the Kitchen is an independent, gourmet kitchenware store in Rapid City, South Dakota. We are your shop for "all things kitchen". Enjoy a leisurely shopping experience in the world of kitchen and home.

RECIPE ARCHIVE IV

Homemade Peppermint Patties

Lia Soneson

Today we're making homemade peppermint patties! Soft, creamy peppermint filling is coated with rich dark chocolate in this classic holiday treat! This recipe may be made with family members young and old, and is perfect for gifting and enjoying together this holiday season! Make a double batch and freeze some to enjoy all winter long!


Homemade Peppermint Patties
Makes 50 patties

Ingredients:
1 can (14 oz) sweetened condensed milk
1/4 cup light corn syrup
1-1/4 tsp peppermint extract, plus more if desired
1/2 tsp vanilla extract
7 cups powdered sugar, plus more for sprinkling
3 cups dark melting chocolate discs
1 tablespoon coconut oil
1/4 cup crushed peppermint candy for sprinkling (~14 peppermint discs)

1. In a stand mixer with the paddle attachment, mix the condensed milk, corn syrup, peppermint extract, vanilla extract, and powdered sugar until combined. Taste peppermint 'dough' and add a few more drops of peppermint extract if desired.

2. Remove the mixture from the bowl and form two discs. Cover with plastic wrap and refrigerate for 30 minutes.

3. Once chilled, unwrap one of the discs and place on parchment paper that's been dusted lightly with powdered sugar. Use a rolling pin to roll out the doughy mixture into a roughly 1/4" thick slab. Use a 1-1/2" cookie cutter to cut out peppermint rounds. Peel back the extra dough from the circles, roll out again and repeat the cutting process until all of the mixture has been used.

4. Place patties on a rimmed sheet pan lined with wax paper and place in the freezer for 20 minutes. Repeat the rolling and cutting process with the second batch of 'dough'.

5. Use a double boiler to melt the chocolate and coconut oil (or microwave in a microwave safe bowl for 1 minute and 20 seconds, stirring halfway through), stirring to ensure there are no lumps and that all of the chocolate has melted.

6. Remove the patties from the freezer and use a fork or a candy dipping tool to dip the patties into the chocolate until fully coated. Tap to remove any excess chocolate. Transfer the chocolate-coated patties back to the wax paper and top with crushed peppermint before the chocolate sets. Let the chocolates cool and harden. Store in an airtight container in the refrigerator or the freezer until ready to enjoy.

Tip: Make sure the centers have been fully frozen before dipping! If they are still warm, they may begin to melt under the heat of the chocolate, causing the patty to lose its form.


Cinnamon Almond Dutch Letters

Lia Soneson

When we want to make something a little special for the holidays, we reach for our Dutch letter recipe. This flaky, sugary pastry wrapped around a cinnamon almond filling pairs perfectly with a cup of coffee. The sweet morsels beg to be enjoyed often, and prove great for gifting. Keep this recipe at the front of your holiday recipe folder!


Cinnamon Almond Dutch Letters
Makes 16 pastries

Ingredients - Almond Filling
1 cup water
​1-1/2 cups almonds
​1-1/2 cups confectioners' sugar
​1/4 teaspoon salt
​1/2 teaspoon cinnamon
​1/4 teaspoon nutmeg
​1/3 cup granulated sugar
​3/4 cup packed brown sugar
​2 egg whites
​1-1/2 teaspoons almond extract

Ingredients - Pastry Dough
4-3/4 cups all-purpose flour
​1/2 teaspoon salt
​2 cups cold butter, plus
​2 tablespoons, cut into 1/2" slices
​1 egg, beaten
​1 cup ice water
​1/4 cup coarse sugar
​1/4 cup whole milk

Directions - Almond Filling
1. Start by blanching the almonds. Boil 1 cup of water. Place the almonds in a medium bowl. Once the water is boiling, pour the boiling water into the bowl, just covering the almonds. Soak the almonds for 1 minute, then strain the almonds through a colander and rinse with cold water until the almonds are cool. Pour almonds onto a paper towel-lined plate and pat dry. Remove the almond skins by pinching one end of the almond (the nut should slip out of the skin easily). Remove and discard all of the almond skins. Let the almonds dry. (If you want to skip this step, substitute the same quantity of almond flour/meal.

2. Place the blanched and dried almonds in a food processor. Cover, and process the almonds until smooth. Add the confectioners' sugar, salt, cinnamon, and nutmeg and blend until combined. Add the egg whites and almond extract, and process until smooth. Transfer to a small bowl and stir the granulated sugar and brown sugar in with the almond mixture until combined.

3. Remove the almond paste from the food processor, scraping the sides. Wrap the paste in plastic wrap and refrigerate until ready to use.

Directions - Pastry Dough
1. In a large mixing bowl, mix together the flour and salt. Add the butter slices to the flour and toss to ensure the butter pieces are coated and not sticking together.

2. In a small mixing bowl, use a fork to combine the egg and ice water. Pour the egg mixture into the flour mixture and use a wooden spoon to combine. The flour will still be somewhat dry and the butter will retain its shape.

3. Turn the dough onto a lightly floured surface and knead the dough to form a ball. Repeat this about 5 times. Once kneaded, form the dough into a rectangle.4. Using a lightly floured rolling pin, roll the dough into a 15 x 10-inch rectangle. Fold the two shorter sides into the center of the rectangle to meet each other and then fold the rectangle at the center crease, creating 4 layers.

5. Roll out and fold the dough again in the same way. Then wrap the dough in plastic wrap and chill in the refrigerator for 20 minutes. Once chilled, repeat the same rolling and folding steps 2 more times. Chill again for another 20 minutes until ready to prepare the Dutch letters.

6. Use a knife to cut the dough into 4 equal pieces. Wrap 3 of the pieces in plastic wrap and chill in the refrigerator. Roll the remaining piece onto a lightly floured surface to form a 12 x 10-inch rectangle. Use a sharp knife to cut the rectangle of dough into 4 equal 2.5 x 12-inch rectangles.

7. Form the almond filling into a rope approximately 11" long and 1/2" thick and place it along the center of a strip of dough. Roll the strip lengthwise and use a pastry brush to brush the edges with milk. Pinch the edges to seal, leaving the ends open. On an uncreased baking sheet, place the strip seam side down and shape it into an "S." Use a pastry brush to lightly brush the top with milk and sprinkle with the coarse sugar.

8. Repeat this process until all of the letters have been prepared.

9. Place letters seam side down on ungreased baking sheets. Bake in a preheated oven at 375°F for 25 minutes or until letters are golden. Remove from the oven and cool on cooling racks. 

Pecan Sticky Buns

Lia Soneson

Everyone loves freshly baked pecan sticky buns! Prepare the dough the night before, then roll-up and bake the next morning for a delicious breakfast this holiday season! These buns are easier than you think to make. Once baked, the warm buns and gooey pecans are sticky sweet and wonderfully satisfying. Your family and guests will swoon at your baking abilities!


Pecan Sticky Buns
Makes 12 large rolls

Dough Ingredients:
1 cup of warm water (110-115°F)
1 pkg (2-1/4 tsp) active dry yeast
1/2 cup white sugar
1/4 cup plain yogurt
2 teaspoons Kosher salt
2 eggs
6 tablespoons butter, melted
5 - 5.5 cups all-purpose flour, divided
Vegetable oil for greasing bowl 

Filling Ingredients:
6 tablespoons butter, softened
1 cup brown sugar
1-1/2 tablespoons cinnamon
1 teaspoon cornstarch 

Pecan Topping Ingredients:
2 cups (8 oz) pecan halves
1/2 cup butter
1/2 cup packed brown sugar
1/4 cup heavy cream
1/3 cup pure maple syrup
1/4 teaspoon cinnamon
1 teaspoon vanilla extract

Directions:

1. In the bowl of a stand mixer, or a large mixing bowl, pour in the warm water and sprinkle the top with the yeast granules. Allow the yeast to dissolve and bloom without stirring or disturbing the bowl. (If you like, add a pinch of the sugar into the warm water prior to adding the yeast – this provides some food for the yeast.)

2. In a separate, small bowl, stir together the sugar, yogurt, salt, and eggs until evenly combined. Melt the butter, allow it to cool slightly, then add to the yogurt-egg mixture. Pour into the bowl with the yeast, and combine on a low setting in a mixer outfitted with the paddle. 

3. Add 3 cups of the flour and beat on a low setting until a thick, even batter is formed. Scrape down the sides of the bowl as needed. Add the remaining flour a cup at a time until a shaggy dough forms. 

4. Change the mixer’s attachment to the dough hook and knead on the mixer’s low setting for 5 minutes. The dough will be a rather sticky one, but becomes less so as it is kneaded and the glutens form. 

5. Remove the dough from the mixing bowl and form into a smooth ball using your hands. Place the dough in a well-oiled large bowl, roll it around so that all surfaces of the dough ball become oiled. Cover the bowl and allow to rise until doubled in size – about 1 – 1.5 hours depending on the ambient temperature.

6. After the dough’s first, full rise, punch down the dough in the bowl. Gather the dough together and with a couple quick kneading motions, reform a compact dough ball. Cover the bowl with plastic wrap and place in the refrigerator for 8 hours overnight, or up to 48 hours. This refrigeration step allows the yeast fermentation to continue and flavors to deepen. As well, chilled dough is much easier to handle. (It also allows for a do-ahead preparation of the dough and baking at a later time).

7. An hour prior to baking, remove the dough from the refrigerator and knead a few times to eliminate any air bubbles. Dust the working surface with a small amount of flour to keep the dough from sticking. Press, stretch, and roll the dough into a large rectangle, approximately 16” x 20”.

8. Prepare the cinnamon filling by stirring together the brown sugar, cinnamon, and cornstarch until evenly combined. Ensure that the butter is softened and easily spreadable. Spread the softened butter onto the rolled rectangle of dough. Sprinkle the brown sugar mixture evenly on top of the butter. 

9. Beginning on one of the dough rectangle’s long edge, begin rolling the dough. Place the rolled dough seam-side down.

10. Mark the dough with the edge of a knife at the halfway point, then the quarter point, etc. until twelve even pieces are marked. With a serrated blade, cut the roll into slices. Set the rolls with space between them on a piece of parchment to rise making the sticky sauce.

11. Prepare the sticky sauce. Melt the butter in a saucepan. Stir in the brown sugar, heavy cream, maple syrup and cinnamon. Stir and heat until bubbly and the sugar has dissolved (about 3-4 minutes). Remove from the heat and stir in the vanilla.

12. Grease a 9” x 13” pan with baking spray and then layer the pecans on the bottom of the pan. Pour the sticky sauce over the pecans. Place the twelve rolls on top of the sauce. To prevent spills in the oven, place a sheet pan on the rack underneath the baking pan.13. Allow the rolls to rise in the pan for about another 20 minutes. Meanwhile, preheat the oven to 350°F. Bake the rolls for about 30 minutes or until nicely golden brown or the internal temperature of the bread reaches 180°F. Cool on a wire rack. 14. Let the pan cool slightly, then turn upside-down on a platter to serve with the sticky sauce and pecans overflowing over the baked rolls. Enjoy while warm!

Turkey Roulade with Sausage Stuffing

Lia Soneson

A turkey roulade is an attractive alternative to roasting a whole turkey for the holidays (or any time!). Still sized for a crowd, this recipe requires a fraction of the time to roast, and is filled with savory deliciousness! Assembling the roulade takes a bit of patience, but it is easier than one might think. Get ready to dazzle your family and friends with moist, flavorful turkey this year!


Turkey Roulade with Sausage Stuffing
Serves 6-8

Sausage Stuffing Ingredients:
2 tablespoons butter
1 cup diced onion
1 cup diced celery
1 pound sweet Italian sausage
2 tablespoons fresh sage, minced
1 tablespoon fresh rosemary, minced
1/4 teaspoon Kosher salt
1/4 teaspoon pepper
1 cup Panko bread crumbs
1/2 to 1 cup chicken broth

Turkey Ingredients:
2 boneless, skinless turkey breasts (about 3 pounds total) pounded very flat with a meat pounder
2 tablespoons butter, melted
1/4 teaspoon Kosher salt
1/4 teaspoon pepper
2 cups chicken broth
Kitchen twine for tying

Gravy Ingredients:
2 tablespoons butter
2 tablespoons flour
1 large shallot, (about 1/4 cup) minced
1/2 cup white wine
1-2 cups additional chicken broth (to add to roasting pan juices)
Salt and pepper, to taste

1. Prepare the Filling: In a large sauté pan, cook the onions and celery in two tablespoons of butter until softened and  translucent.

2. Add the sweet Italian sausage and cook until browned. Season the sausage and veggies with the rosemary, sage, Kosher salt, and pepper. 3. Stir in the Panko bread crumbs, and then add the chicken broth and fold together until just moistened.

4. Prepare the Turkey: Arrange the butterflied breasts in single layer on a large cutting board (or two) nested in a full  sheet pan.

5.Place a few layers of plastic wrap over the breasts. Use a meat mallet to flatten out the meat until it becomes a very large rectangle with an even thickness (about 1/4-inch to 1/3-inch thick).

6. Roll it Up! Spread the filling over the butterflied and pounded out breast in a single layer.

7. Roll the turkey and filling together lengthwise. Tie the turkey roll with kitchen twine about every two inches to keep the roll even and intact during roasting. You can tighten where needed with the kitchen twine to make a uniform roll-up.

8. Roast the Roulade: Preheat the oven to 350°F.

9.Rub 2 tablespoons of butter all over the rolled up breast and sprinkle with Kosher salt and pepper. Place the roulade on a rack over a sheet pan. Add 2 cups of chicken broth to the bottom of the pan. Bake until the center of each breast reads 165°F, about 40 to 45 minutes depending on the thickness of the roll.

10. Prepare the Gravy: Pour the roasting juices into a gravy separator or large bowl. Skim away most of the fatty layer leaving the rich roasting pan juices. Add additional chicken broth, if needed, to reach 2 cups of liquid. Set aside.

11. Meanwhile, melt the butter in a large skillet. Add the shallot, and sauté until translucent. Add the flour, and whisk until the roux turns a light brown. Add the fresh herbs and white wine; simmer until the wine reduces by half. Add one cup of the roasting juices, whisk, and simmer until the gravy starts to thicken. Continue to add a quarter cup of liquid at a time (up to an additional one cup) while continually whisking until the desired consistency is reached. Season with salt and pepper, to taste.

12. Slice and Serve: Once the turkey is roasted, let the roulade rest for 10 minutes before serving. Remove the kitchen twine, slice, and serve with the gravy.

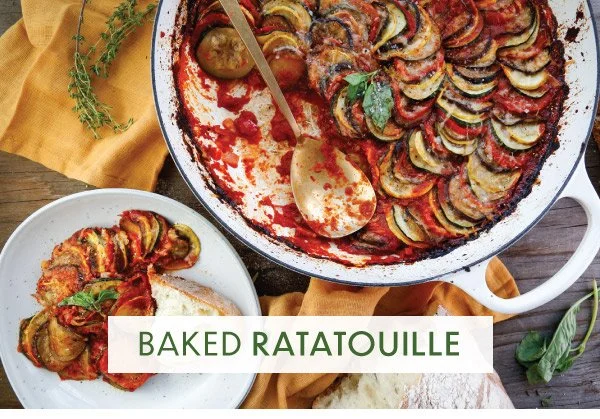
Baked Ratatouille

Lia Soneson

This healthy, Provencal stew is all about presentation! Colorful layers of thinly sliced vegetables are arranged over a beautiful stew of tomatoes, onion, and red pepper to create a hearty, vegetarian dish that’s bound to receive raves. Enjoy with creamy polenta, or a loaf of crusty bread and butter.


Baked Ratatouille
Serve 6

Ratatouille Ingredients:
2 zucchini
2 yellow squash
2 Japanese eggplant
2 teaspoons kosher salt, divided
6 small vine tomatoes
6 tablespoons olive oil, divided
1 medium onion, peeled and sliced
6 cloves garlic, chopped
1 red bell pepper, seeded and finely chopped
1 tablespoon tomato paste
1 can (14 oz) crushed tomatoes
1/2 tablespoon red wine vinegar
1 tablespoon balsamic vinegar
1/4 teaspoon crushed red pepper
1/4 teaspoon kosher salt, plus more to taste
1/4 teaspoon black pepper, plus more to taste
2 teaspoons chopped fresh thyme
1/4 cup grated Parmigiano Reggiano for topping
Fresh basil, julienned, for garnish

Directions:
1. Use a mandoline to slice the zucchini, yellow squash, eggplant, and tomatoes into thin rounds, approximately 1/16" thick. Toss the zucchini, yellow squash, and eggplant slices with 1-1/2 teaspoons salt in a colander and let sit for 30 minutes to release water. Lay the tomatoes on a paper towel-lined plate and sprinkle the tomatoes with another 1/2 teaspoon of salt, letting rest for 30 minutes. After 30 minutes, pat dry with paper towels.

2. Heat 2 tablespoons olive oil in a 5 qt oven safe braiser (or another heavy, oven-proof pot) over medium-high. In two batches, add half the zucchini, yellow squash, and Japanese eggplant and cook until the vegetables begin to brown slightly, about 5-7 minutes. Transfer to a bowl and repeat with another 2 tablespoons olive oil and the remaining zucchini, yellow squash, and eggplant. Remove and set aside. 

3. Preheat the oven to 375°F. In the same braiser, heat the final 2 tablespoons olive oil over medium heat and sauté the onions, garlic, and bell peppers until soft and translucent, about 5-7 minutes. Add the tomato paste and cook for another 10 minutes, then add the crushed tomatoes, vinegars, crushed red pepper, salt, pepper, and fresh thyme and stir and cook for another 2 minutes until the flavors are incorporated. 

4. Use a spoon to smooth the sauce, and arrange the zucchini, squash, Japanese eggplant, and tomato slices in a circle, alternating by color. Start the layering around the perimeter of the dish and work inward toward the center.

5. Cover with aluminum foil or an oven safe lid, and bake for 20 minutes until the ratatouille is bubbling. Remove from the oven, sprinkle with Parmigiano Reggiano, and cook for 15 more minutes until the cheese has browned. Remove from the oven, let cool for 5-10 minutes and serve with a side of rustic bread or a bowl of polenta.

Bread Pudding with Cherries and a Bourbon Cream Sauce

Lia Soneson

A classic, crowd-pleasing dessert, this bread pudding is embellished with cherries and a decadent bourbon cream sauce. Hands-down, this is our favorite way to transform bread into a custard-y sweet ending. A perfect way to celebrate the season!


Bread Pudding with Cherries and a Bourbon Cream Sauce
Serves 6 - 8

Bread Pudding Ingredients:
1/2 cup dried cherries, soaked in 2 tablespoons of bourbon
6 cups bread cubes (8 thick slices or 1 loaf French bread), one or two day old bread works best!
1/4 cup butter
1/2 cup brown sugar
2 teaspoons vanilla extract
4 eggs
2 cups half-and-half
1 cup whole milk
1 teaspoon ground cinnamon
1/4 teaspoon ground nutmeg
1/4 teaspoon salt

Bourbon Cream Sauce Ingredients:
2 cups heavy cream
1 tablespoon vanilla extract
1/4 cup sugar
1 tablespoon cornstarch dissolved in 1/4 cup bourbon
1 tablespoon butter

Directions:

1. Preheat the oven to 350°F. Grease a 9” x 13” (or equivalent) casserole dish with butter.

2. In a small bowl, soak the cherries in the bourbon for 30 minutes.

3. Cube the bread into 1-inch cubes. Spread on a sheet pan and bake for about 12 minutes until the bread is lightly toasted. Place the toasted bread into the greased casserole dish.

4. In a bowl, prepare the custard mixture. Melt the butter and then whisk in the brown sugar, vanilla extract, eggs, half and half, whole milk, cinnamon, nutmeg, and salt.

5. Pour the custard mix over the cubed bread, cover, and refrigerate for at least one hour, or until the bread has soaked up all of the liquid. Once the pudding is ready to bake, pour the bourbon-soaked cherries over the soaked bread. Tip: Ensure all cubes are well-soaked with custard while resting in the refrigerator. Gently stir or mix if, needed.

6. Preheat the oven to 350°F. Bake for 45-50 minutes or until the pudding is set in the center.

7. While the pudding bread bakes, prepare the bourbon cream sauce. In a saucepan, warm the cream, vanilla, and sugar until it begins to simmer. Whisk the cornstarch into the bourbon, then add it to the sauce. Heat on a low simmer until the sauce is thickened slightly. As the final step, stir the butter in until melted.

8. Serve the bread pudding with the sauce. We poured one cup (or about half) of the sauce over the whole batch of freshly baked bread pudding, and then served the remaining sauce on the side for those who are looking for an extra drizzle of sweetness!

Pumpkin Bread with Brown Butter Frosting

Lia Soneson

Craving more of those seasonal fall pumpkin flavors? Here’s your recipe! Warm spices overflow in this rich pumpkin bread. The batter comes together in a snap, and the nutty brown butter frosting eliminates any worry about making just another plain pumpkin loaf. Pair it with morning coffee, or enjoy an after dinner slice for some sweet satisfaction.


Pumpkin Bread with Brown Butter Frosting
Makes two 8” x 4” loaves

Pumpkin Bread Ingredients:
1-1/2 cups granulated sugar
1/2 cup light brown sugar
2 large eggs
1-1/2 cups melted unsalted butter, cooled slightly
1-1/2 cups canned pumpkin puree (one 15-oz. can)
 teaspoon vanilla extract
2 cups all-purpose flour
1/2 teaspoon baking powder
1 teaspoon baking soda
1/21 teaspoon cinnamon  
1/2 teaspoon ground nutmeg
1/2 teaspoon ground cloves 
1/4 teaspoon ground ginger

Brown Butter Frosting:
1 cup (2 sticks) salted butter
1-1/2 teaspoons vanilla extract
2-1/2 cups confectioner’s sugar
1 teaspoon cinnamon
10 pecans, chopped (for topping) teaspoon salt

Directions:
(1) Preheat the oven to 350°F. Lightly grease and flour the sides and bottom of two 1 lb loaf pans, tap out any excess flour, and set aside.

(2) In a stand mixer with the paddle attachment on medium speed, mix together the granulated sugar, brown sugar, eggs, and melted butter.

(3) Add the pumpkin puree and vanilla extract, and continue to mix until combined.

(4) In a separate bowl combine the flour, baking powder, baking soda, salt, cinnamon, nutmeg, cloves, and ginger, and stir to combine.

(5) Gradually add the dry ingredients to the wet ingredients using a silicone spatula to stir slowly; fold the ingredients together until combined. Avoid over-stirring.

(6) Carefully pour the batter into the prepared loaf pans, filling each pan to be 2/3 full.

(7) Bake on the center rack for 45-55 minutes or until the loaf is browned and a toothpick comes out cleanly. Cool in the loaf pan for 10 minutes before removing from the pan. Remove and place on a cooling rack to finishing cooling.

(8) While the loaf cools, prepare the icing. Brown the butter in a sauce pan by heating it over medium high heat until it begins to foam. When the butter starts foaming, reduce the heat to medium and constantly stir the butter until it turns brown and begins to smell nutty. Remove the butter from the heat and let it cool for about 10 minutes.

(9) While the butter is still warm, whisk the vanilla and the cinnamon into the butter. Slowly whisk in the confectioner’s sugar 1/4 cup at a time until is the consistency of smooth, spreadable icing.

(10) Spread the icing onto the loaves and sprinkle with chopped pecans. Let the loaves sit for 30 minutes to let the icing cool. Slice and serve.

Roasted Chicken with Lemon, Herbs, & Root Vegetables

Lia Soneson

Bright flavors enhance this deliciously roasted chicken! Lemon lends its magic in two ways – the juice and the flavorful peel. The pairing of fresh rosemary and thyme with the lemon completes the delicious flavor profile. The chicken stays juicy thanks to the compound butter tucked under the skin of the chicken. The complementary roasted root vegetables make this chicken dinner a hearty and warming autumn meal.


Roasted Chicken with Lemon, Herbs, & Root Vegetables
Serves 4-6

Ingredients:

1 (5-6 pound) whole chicken
8 tablespoons (1 stick) butter, softened
2 sprigs rosemary, leaves removed and minced
2 tablespoons thyme leaves, stripped from the stem
1 large lemon, zested, halved and sliced
6 cloves garlic, crushed
2 teaspoons Kosher salt
1 teaspoon freshly ground pepper
1 onion, sliced in chunks
3-5 carrots, sliced on a diagonal
3 beets, sliced in half moons
1 sweet potato, halved and sliced in 1 to 2-inch slices
2 Yukon gold potatoes, halved and sliced
Olive oil for drizzling for roasting vegetables

Directions:

(1) Preheat the oven to 400°F. Prepare the chicken for roasting by removing any chicken parts stored in the neck and/or inner cavities. (Do not wash or rinse the chicken – experts say the process of washing the chicken can disperse bacteria around the kitchen; better to handle less and roast the chicken well.) Place the chicken, breast-side up in a heavy roasting pan that’s been generously oiled.

(2) In a small bowl, with a sturdy fork or spoon, or by using a hand mixer on low speed, mix the butter, rosemary, thyme leaves, zest of one lemon, salt, and pepper. 

(3) Separate the skin from the chicken in the breast area using a spoon or your fingers. Tuck in half the compound butter in these pockets under the skin. Place the lemon quarters and garlic cloves inside the chicken’s cavity. Tie the legs together using baking twine and tuck the wings under the chicken. Smear the remaining compound butter all over the outside of the chicken. Salt and pepper the outside of the chicken.

(4) Prep the roasting vegetables by slicing. Place the roasting vegetables in the pan and drizzle with a little olive oil. Rest the prepared chicken on top. Add the remaining lemon slices around the vegetables.

(5) Roast the chicken, uncovered, for 60-90 minutes. Continue roasting until the thickest part of chicken reaches 165°F. Loosely tent the top with aluminum foil if it is browning too quickly.

(6) Transfer the roasted chicken to a cutting board for carving, or to a platter if carving at the table.

Apple Crème Brûlée

Lia Soneson

Brûlée means “burnt cream.” The dessert consists of a vanilla-rich custard topped with a layer of caramelized sugar. The sugar transforms to a thin, hard crust with a subtle burnt flavor that perfectly complements the sweet custard. With just five ingredients, the making of crème brûlée is all technique. Once mastered – and it’s easy to do so -- this dessert will become a signature dish in your repertoire.


Apple Crème Brûlée
Serves 6

Ingredients:
3 medium tart apples (we used Pink Lady apples this time), peeled, cored, 1/4" dice
2 tablespoons butter
1/4 teaspoon cinnamon
1/8 teaspoon cloves
1/8 teaspoon nutmeg
2 tablespoons brandy
3 cups heavy cream
1/2 cup granulated white sugar, divided
1 tablespoon vanilla extract
6 large egg yolks
1/8 teaspoon Kosher salt

Topping:
1/4 cup white sugar
1/4 cup brown sugar

Directions:
1. Prepare the apples by peeling, coring, and dicing into a small 1/4” dice.
2. Sauté the apples for about 10 minutes. In a large skillet, melt the butter and sauté the apples until fully softened. Deglaze the pan with 2 tablespoons of brandy. Season the cooked apples with cinnamon, cloves, and nutmeg. Divide the cooked apples evenly into each of the ramekins.
3. Preheat the oven to 325°F. Place the ramekins in a large rimmed baking pan.
4.In a saucepan, heat the cream, and add 1/4 cup of the sugar. Add the vanilla extract and bring to a simmer – just short of a boil.
5. Meanwhile, in a medium mixing bowl with a hand mixer, beat together the egg yolks, the other half of the sugar (1/4 cup), and salt until well combined and slightly lightened in color.
6.Temper the egg yolk mixture by drizzling in a half a cup of the warm cream while continuously whisking. Repeat the addition of warmed cream in increments until all is added. Go slowly to avoid scrambling the eggs!
7. Pour the mixture through a fine sieve to remove any curdled egg. Skim off any foam that forms on the top of the mixture. Pour the strained mixture into the apple-filled ramekins filling them nearly to top.
8. Place the baking pan of ramekins in the oven. Carefully add water to the pan to surround the ramekins to a height halfway up the sides of the ramekins.
9. Bake at 325°F until the custard is set – that is, when the edges are set, and the center is thickened yet still has a little jiggle. Baking times will vary based on the type and size of ramekin used. For the ramekins we used (1/2-inch custard depth), we baked them for 35 minutes; bake deeper ramekins for a longer period of time – as much as 60 minutes.
10.Carefully remove the ramekins from the water and cool on a rack. Cover each ramekin with plastic wrap and chill thoroughly for 4 hours or up to 3 days.
11. Just prior to serving, remove the ramekins from the refrigerator and pat the tops of the custard with a paper towel to remove any condensation or weeping. Sprinkle superfine sugar on top of the custard to cover in a thin, even layer. Using a culinary torch, heat the sugar top using a sweeping circular motion to melt the sugar. When the sugar is melted and turning an amber color, move on to the next ramekin. The liquid, caramelized sugar will cool quickly and form a thin, hard crust on top. [Alternatively, place the ramekins under an oven broiler to caramelize the sugar. Frequently rotate the pan holding the ramekins for even exposure to the broiler’s heat. Watch carefully to avoid burning!]
12. Serve immediately for maximum crackle in the crust (vs. a softened crust which can happen over time). We like to serve our crème brûlée with demitasse spoons to savor each small bite.

Ricotta Gnudi with Brown Butter & Crispy Sage

Lia Soneson

Gnudi are on the menu tonight! Similar to gnocchi, gnudi are tender dumplings made with ricotta, semolina flour, egg yolks, salt, and Parmesan cheese. The light, pillows of flavor pair wonderfully with a simple brown butter sauce and crispy sage. These simple dumplings just might become this year’s fall favorite!


Ricotta Gnudi with Brown Butter & Crispy Sage
Serves 4-6

Ricotta Gnudi Ingredients:
1 lb ricotta cheese
1 cup finely grated
Parmesan cheese
2 egg yolks, beaten
1 teaspoon Kosher salt
1 to 1-1/4 cups semolina flour, plus extra for rolling out

Directions:
1. Prepare the Ricotta Gnudi. Strain the ricotta with a piece of cheesecloth, or with a paper towel lining a strainer for about 5 minutes. Gently squeeze out any excess moisture, and place in a large bowl.
2. Add the Parmesan cheese, egg yolks, and salt to the strained ricotta, and stir until evenly combined.
3. Add 1 cup of the semolina flour into the ricotta mixture, and stir to combine until a loose dough ball is formed. If the dough appears too wet, add additional tablespoons of the semolina flour, up to a 1/4 cup, to reach a workable dough. (The consistency of the drained ricotta impacts how much semolina flour is needed.)
4. On a semolina-floured work surface, divide the dough in half. Gently cut each half in half again and form the four pieces into ropes, about 1-inch in diameter. The dough will be very tender and delicate, so work the dough with a light touch. Cut each rope into 1-inch long pieces. Place the cut gnudi on a parchment-lined baking sheet and refrigerate for at least one hour, or up to overnight.
5. Sizzle the Sage. Before the gnudi are ready to cook, prepare the brown butter sauce and the crispy sage
leaves. Melt the butter slices in a large skillet or braiser. Add the smashed garlic clove. Sizzle the sage leaves
until just crisp in the butter. Remove the sage leaves and let drain on a paper towel-lined plate. Remove the garlic and discard. Let the butter continue to heat until it turns a golden brown hue. Meanwhile, begin cooking the gnudi.
6. Cook the Gnudi. Use a large pasta pot and bring generously salted water to a gentle boil. Carefully add the fresh gnudi in batches, and boil for 1-2 minutes. Boil the gnudi in small batches taking care not to overload the pot. Avoid overcooking the gnudi -- they may begin to fall apart if cooked too long. Carefully scoop out the cooked gnudi with a slotted spoon or spider strainer, and place directly into the waiting brown butter.
7. Carefully stir the cooked gnudi until coated with the brown butter sauce. Add 1/4 cup reserved pasta water, as needed to ensure the sauce coats the gnudi. Taste the sauce and season with additional Kosher salt and pepper.
8. Serve the gnudi with a garnish of crispy sage leaves, and a generous dusting of finely grated Parmesan cheese.

Caramelized Sweet Potato & Kale Salad with Tahini Dressing

Lia Soneson

Highlight the harvest season with this hearty fall salad. Earthy, caramelized sweet potatoes delicately balance out the mildly bitter kale in a colorful medley that is truly a meal in itself. Sweeten the deal with golden raisins, fresh plums, tangy feta, and crispy fried chickpeas. Then give it all a final toss with our lemony, homemade, tahini dressing. Autumn perfection!


Caramelized Sweet Potato & Kale Salad with Tahini Dressing
Serves 6

Salad Ingredients:
1 small shallot, thinly sliced
2 sweet potatoes, peeled, sliced into 1/4" discs
6 tablespoons olive oil, divided
1 teaspoon balsamic vinegar
1 tablespoon maple syrup
1/4 teaspoon Kosher salt
1/4 teaspoon black pepper
1 can (15 oz) chickpeas, rinsed and patted dry
1 large bunch Lacinato kale
2 plums, pitted and sliced
1/4 cup golden raisins
4 oz feta cheese, crumbled
1/3 cup chopped almonds
1 tablespoon sesame seeds
1 bunch mint leaves, torn

Directions:
1. In a large bowl, toss the shallot and sweet potatoes in 2 tablespoons of olive oil, balsamic vinegar, maple syrup, salt, and pepper until coated. Preheat the oven to 400°F and spread the mixture evenly on a roasting pan. Roast for 25-30 minutes until the sweet potatoes are golden and fork tender. Set aside to cool.
2. Fry the chickpeas by heating 3 tablespoons of olive oil in a skillet over medium high heat. Add chickpeas and sauté for 4-5 minutes, stirring often to ensure even cooking. Once the chickpeas are golden, remove them with a slotted spoon and transfer to a paper towel-lined plate. Sprinkle with a pinch of salt and set aside to cool.
3. Strip the kale from the stem and in a large bowl, massage the kale in 1 tablespoon of olive oil for about 2 minutes, until the fibers begin to break down.
4. Whisk all of the tahini dressing ingredients together until well combined.
5. In a large bowl, toss the kale with the dressing, and then add the caramelized sweet potatoes, chickpeas, plums, golden raisins, feta cheese, almonds, sesame seeds, and torn mint leaves. Toss and serve immediately.

Tahini Dressing Ingredients:
1/4 cup tahini
2 tablespoons fresh lemon juice (about 1 lemon)
1/2 cup extra virgin olive oil
1 clove garlic, minced
1 teaspoon sesame oil
1/4 teaspoon Kosher salt
1/4 teaspoon pepper
1 tablespoon water (if needed, to thin)

Tater Tot® Breakfast Casserole

Lia Soneson

Tatertots_v2_01.jpg

Destined to become a family favorite, this breakfast casserole is a breeze to make, and totally delivers on flavor. Loaded with goodies like breakfast sausage, onion, pepper, cheese, and eggs, it’s finished with the best part of all - crispy tater tots! Breakfast (or lunch, or dinner) is served!


Tater Tot® Breakfast Casserole
Serves 4-6

Ingredients:
1 lb breakfast sausage
1 onion, diced
1 red bell pepper, diced
1 tablespoon olive oil
1 (4oz) can green chiles
8 eggs
1/2 cup whole milk
1/2 teaspoon Kosher salt
1 cup sharp cheddar cheese, thickly grated
32 ounces frozen tater tots®
Chives for garnish
Hot sauce, optional for serving

Directions:
1. Preheat the oven to 350ºF.
2. In a large cast iron skillet, crumble and cook the sausage until fully cooked and browned on all sides. Drain the cooked sausage on a paper towel-lined plate.
3. In the same skillet, sauté the onion and peppers for about five minutes or until the onions become translucent. When sautéing, add a tablespoon of olive oil, if needed. Add the cooked and drained sausage back to the skillet along with the green chiles, and stir until combined.
4. In a large bowl, whisk the eggs, milk, salt, and pepper together until combined.
5. Pour the egg mixture over the sausage and cooked veggies. Sprinkle the cheddar cheese on top.
6. Finally, layer the tater tots in a concentric circle on top of the egg mixture and bake for 30-35 minutes or until the eggs are set and the tater tots have crisped to a golden, brown color.
7. Serve hot with a garnish of chives and optional dash of hot sauce.

Baingan Bharta (Spicy Indian Eggplant)

Lia Soneson

Bharta_Eggplant_V2_01.jpg

This beautiful, warming Punjabi eggplant dish is a true gift from Northern Indian cuisine. Smoky eggplant and spicy green chiles sing when simmered in a stew of juicy tomatoes and caramelized onion. Bright peas and toasty spices make it a perfectly satisfying fall meal.


Baingan Bharta (Spicy Indian Eggplant)
Serves 4

Ingredients:
2 large eggplants
2 green chiles
8 cloves garlic
1 tablespoon butter
3 tablespoons olive oil, divided
2 medium onions, diced
2 teaspoons garam masala
1/2 teaspoon cumin seeds
1/2 teaspoon turmeric
1/4 teaspoon cayenne
1-1/2" fresh ginger root, finely grated
5 small tomatoes, diced
1/2 teaspoon salt
1/4 teaspoon black pepper
1 cup frozen peas, thawed

For Serving and Garnishing:
2 cups cooked jasmine rice, for serving
Fresh cilantro leaves
1 lemon, sliced

Directions:
1. Rinse and dry the eggplant and green chiles. Make 4 slits in each of the eggplants' skin and insert the garlic cloves, securing them firmly in place. Heat the eggplant and green chiles over an open flame until charred and beginning to collapse. Turning with tongs often to ensure an even char, about 10-15 minutes.

2. Transfer the green chiles and eggplant to a large glass bowl and seal with plastic wrap. Let rest for 10 minutes. When cooled, remove the eggplant from the bowl. Remove the garlic from the eggplant, finely mince, and set aside. Use your hands to remove the eggplant and green chile skins and use a fork to mash the eggplant into a pulpy consistency. Chop the green chiles, remove the seeds, and set aside. (To bake instead of char, halve the eggplant and lay cut side down, making slits and inserting the garlic the same way. Bake the eggplant and green chiles in the oven at 400°F on a foil-lined baking dish for 30 minutes until soft. Let cool and scoop out the eggplant flesh with a spoon, discarding the skin. Remove the green chile skin and discard. Chop the eggplant and the green chiles and set aside.)

3. Melt the butter in a skillet over medium low heat. Add 1 tablespoon olive oil and the diced onion; cook slowly for
about 20 minutes until the onions begin to brown and caramelize, stirring occasionally to keep them from sticking.

4. In a separate, large sauté pan or Dutch oven, toast the spices over medium-low heat by adding the garam masala, cumin, turmeric, and cayenne; cook for 2-3 minutes, stirring often. Spices should begin to smell fragrant. Add remaining 2 tablespoons olive oil, grated ginger, and the chopped garlic to the spices. Turn the heat to medium and continue to cook for 2 more minutes. Add the tomatoes, salt, and pepper and cook for another 5 minutes until the tomatoes become softened.

5. Add the eggplant, chiles, and caramelized onion to the tomato mixture and cook for 3-4 minutes over medium heat until flavors begin to meld. Add the peas and cook for an additional minute.

6. Season the eggplant dish with additional salt and pepper to taste. Garnish with cilantro and lemon, and serve over freshly cooked jasmine rice.

Apple and Coconut Bundt Cake with Buttermilk Icing and Sugar Coated Pecans

Lia Soneson

AppleCakeDesign_v2_01.jpg

Kick off the fall season with a delicious apple cake! Warm, spiced apples are celebrated in this unassuming cake that is packed with flavor. Beautiful, sugar coated pecans add a delightful crunch while the hot buttermilk icing soaks into every last crack and crevice. We think this will become your new favorite cake and the best way to welcome autumn!


Apple and Coconut Bundt Cake with Buttermilk Icing and Sugar Coated Pecans
Makes one bundt cake

Cake Ingredients:
3 cups all purpose flour
1/4 teaspoon salt
1 teaspoon baking soda
1 teaspoon cinnamon
1/2 teaspoon allspice
3 eggs
2 cups sugar
1-1/2 cup vegetable oil
1/3 cup apple juice
1/2 tablespoon orange zest
1/4 cup sour cream
2 teaspoons vanilla extract
1 tablespoon brandy
2 cups peeled and chopped apples (such as Granny Smith)
1 cup shredded sweetened coconut
3/4 cup chopped pecans

Spiced Orange Pecan Ingredients:
1 large egg white, beaten
1 tablespoon orange juice
1 tablespoon orange zest
1/2 cup granulated sugar
1/4 teaspoon salt
1/2 teaspoon cinnamon
1/8 teaspoon cayenne
1-1/2 cup pecan halves

Icing Ingredients:
6 tablespoons unsalted butter
3/4 cup granulated sugar
1/2 teaspoon baking soda
1/3 cup buttermilk
1 teaspoon vanilla extract

Directions:
1. Grease and flour a bundt pan. Set aside.
2. In a medium bowl, mix the flour, salt, baking soda, cinnamon, and all spice. Set aside.
3. In a stand mixer with the paddle attachment, mix the eggs, sugar, vegetable oil and apple juice on low. Once incorporated, add the flour mixture to the egg mixture and mix on medium speed until combined.
4. Add the orange zest, sour cream, vanilla extract, brandy and mix on low until incorporated.
5. Add the chopped apples, coconut, and chopped pecans and fold into the batter with a large spoon.
6. Pour the batter into the prepped bundt pan and bake at 325°F for 60 minutes, or until a knife placed in the center comes out cleanly.
7. While the cake bakes, prepare the orange pecans by beating the egg white in a shallow bowl. Stir in the orange juice and zest.
8. In a separate bowl mix together the sugar, salt, cinnamon, and cayenne. Set aside.
9. Toss the pecans in the egg white and orange mixture until coated. Remove the nuts and toss them in the sugar mixture until fully coated.
10. Spread the sugar coated pecans out over a parchment or foil lined baking sheet and bake for 15-20 minutes at 350°F, stirring every 10 minutes. Remove from the oven and set aside to cool.
11. Once the cake has been baked, remove from the oven and make the icing. Melt the butter into a small saucepan. Once melted, add the sugar, baking soda, buttermilk, and vanilla extract. Bring ingredients to a rolling boil and while still hot, pour over the bundt cake. Let the cake stand for 1 hour before serving. When ready to serve, top with the spiced orange pecans.

Roasted Sausage & Veggies with Creamy Polenta

Lia Soneson

Sheetpan2021_v12ai_01.jpg

This easy dinner comes together quickly with the help of a simple sheet pan -- perfect for a busy weeknight! Use this basic recipe as a starting point for becoming a pro at “sheet pan cooking,” then get creative. A sausage and veggie sheet pan combo is easily adaptable to whatever ingredients you have on hand. We used sweet Italian sausage, but this would work with nearly any kind of sausage and veggie combo. Once the sheet pan is in the oven, cook the creamy polenta, and voila! Dinner is served!


Roasted Sausage & Veggies with Creamy Polenta
Serves about 4

Sheet Pan Ingredients:1 yellow bell pepper, sliced
1/2 red onion, sliced
2 small zucchini, halved and sliced
8 oz cherry tomatoes, halved
1 bunch purple kale, de-stemmed & torn into bite-sized pieces
5 links sweet Italian sausage, sliced diagonally in half

Seasoning for Sheet Pan:1/4 cup olive oil
1 teaspoon oregano
1 teaspoon basil
1 teaspoon paprika
1/2 teaspoon garlic powder
1/4 teaspoon cayenne pepper
1/2 teaspoon Kosher salt
1/2 teaspoon fresh ground pepper

Creamy Parmesan Polenta Ingredients:Makes about 4 cups cooked polenta
2-1/2 cups water
2 cups whole milk
1-1/2 teaspoons table salt
1 cup polenta (1 cup medium-to-coarse ground yellow cornmeal)
2 tablespoons butter
3/4 cup shredded Parmesan cheese

Directions:
1. Preheat the oven to 425°F with one rack about 4 inches from the broiler and another in the center position.
2. Prepare the veggies for the sheet pan. Slice the peppers, onions, and zucchini. Halve the tomatoes. Add the peppers, onions, zucchini, and tomatoes to a large bowl.
3. Drizzle the olive oil over the prepared vegetables. Then, mix the spices: oregano, basil, paprika, garlic powder, cayenne, Kosher salt, and pepper in a small bowl. Toss the vegetables with the spice mixture evenly until coated.
4. Spread the seasoned vegetables in a single layer across the two sheet pans allowing space around each item to ensure the vegetables roast instead of steam.
5. Halve the sausages, and add to the sheet pans.
6. Bake at 425°F for 20 minutes. Rotate the pans, if needed.
7. Meanwhile, while the sheet pan is baking, wash, de-stem and prep the kale into bite-sized pieces. Massage the kale with 1 tablespoon olive oil and a sprinkle of Kosher salt.
8. Also, while the sheet pan is baking, prepare the polenta. Boil the water, milk, and salt in a medium saucepan over medium heat. Pour in the cornmeal while constantly whisking. Reduce the heat to medium-low and continue to whisk until the cornmeal is incorporated, roughly 5 minutes.
9. Using a wooden spoon, stir until the polenta is thick and creamy, about 15-30 minutes. Add the butter and cheese and stir until melted.
10. After the sheet pan roasts for about 20 minutes, toss the vegetables and turn the sausages. Add the prepped kale, then roast for an additional 5-10 minutes or until all of the vegetables are cooked to your desired level of tenderness. To ensure that the pork sausages are fully cooked, check their internal temperature; it should reach 160°F.
11. Enjoy the roasted veggies and sausages with a serving of the creamy Parmesan polenta.

Hearty Summer Harvest Salad

Lia Soneson

HeartyHarvestSalad_v2_01.jpg

Savor more of summer with this beautiful, flavor-packed salad! Bursting with color and texture, This recipe focuses on capturing end-of-summer fruits and vegetables all in a fabulous salad feast. Grilled beets, fennel, and red onion offer depth and earthiness, while sweet peaches, tangy blackberries, and ripe cherries bring a bright complement to farro’s hearty nature. Drizzle it all with a fresh, honey balsamic dressing for the ultimate summer celebration.


Hearty Summer Harvest Salad
Makes 4 large entrée salads

Salad Ingredients: 
1-1/2 cups farro 
3 cups vegetable broth 
1 teaspoon kosher salt 
1 yellow beet, scrubbed 
2 purple beets, scrubbed 
1 tablespoon olive oil, plus 1 teaspoon 
1/2 cup cherries, halved and pitted 
1/2 fennel bulb, thinly sliced with a mandoline 
1 small red onion, thinly sliced with a mandoline 
1 peach, halved and thinly sliced 
2 stalks celery, thinly sliced with a mandoline 
1/2 cup blackberries 
6 cups arugula
1 cup micro-greens
4 oz. goat cheese, crumbled
1/3 cup Marcona almonds
1/3 cup pistachios

Dressing Ingredients:
1 tablespoon balsamic vinegar dressing
1/4 cup white wine vinegar
1/2 cup extra virgin olive oil
1/2 tablespoon honey 1 clove garlic, minced
1 tablespoon Dijon mustard
1/4 teaspoon black pepper
1/4 teaspoon kosher salt

Directions:
1. Cook the farro in the vegetable broth seasoned with salt over low heat for 20 minutes, or until the grains become tender. Remove from heat and set aside.
2. While the farro cooks, preheat an outdoor grill to medium high heat. Coat a large piece of aluminum foil with 1 tablespoon of olive oil and place the beets in the foil. Wrap the foil over the beets and seal. Place the grill packet on the grill, seam side up, and grill for 35-45 minutes (depending on the size of your beets) or until the beets are very tender and easily pierced with a fork. Remove from heat and let the beets cool, about 15 minutes. Once cooled, remove the beet skins and dice the beets into 1/2" cubes.
3. Place the pitted and halved cherries, sliced fennel, and sliced red onion in a grill basket and drizzle with 1 teaspoon olive oil. Place the grill basket on the grill over indirect heat for 6-8 minutes, until the foods are tender, turning with grill tongs as needed to ensure even cooking.
4. Prepare all of the other vegetables and fruits by halving and slicing the peach, slicing the celery, and washing the blackberries, arugula and micro greens.
5. In a jar or bowl, whisk the dressing ingredients together and set aside.
6. Place the farro in 4 large bowls, top with the beets, cherries, fennel, onion, peaches, celery, blackberries, arugula, and micro greens. Drizzle with the dressing, tossing to coat. Top with the goat cheese, almonds, and pistachios. Enjoy!

No-Bake Blueberry Cheesecake

Lia Soneson

Cheesecake_v3_01.jpg

This no-bake blueberry cheesecake is the perfect, cool dessert to indulge in as summer nears to a close. The almond, graham cracker crust is a delicious nutty base for the creamy cheesecake that features a swirled in vanilla-bourbon blueberry sauce. It’s the perfect dessert for sharing!


No-Bake Blueberry Cheesecake
Makes one 9-inch cheesecake

Almond, Graham Cracker Crust Ingredients:
9 double squares of graham crackers, or 1-1/2 cups crushed
1/2 cup almonds
1 tablespoon brown sugar
1/2 cup butter, melted
1 teaspoon almond extract

Vanilla-Bourbon Blueberry Sauce:
(divide and use for filling and for serving)
3 cups fresh blueberries
1/2 cup water
1/2 teaspoon vanilla extract
3 tablespoons sugar
2 tablespoons bourbon
3 tablespoons cornstarch dissolved in 1/4 cup of cold water
1/8 teaspoon salt
2 tablespoons butter

Blueberry Cheesecake Filling:
1 cup heavy whipping cream
20 oz cream cheese, softened
1 cup powdered sugar
1 teaspoon vanilla extract
1 cup Vanilla-Bourbon Blueberry Sauce (see above)

To Serve:
Fresh blueberries
Blueberry sauce (as above)

Almond, Graham Cracker Crust Directions:
1. Lightly grease a 9-inch springform pan using a non-stick, floured baking spray.
2. In a food processor, pulse together the graham crackers, almonds, and brown sugar until combined. Drizzle in the melted butter, and the almond extract. Pulse until a fine crumb is formed.
3. Press the crust into the bottom of the prepared springform pan, and one to two inches up the sides. Firmly press the crust into place using a glass or measuring cup to help compress the crumbs. Place the crust in the freezer while the cheesecake filling is prepared. 

Vanilla-Bourbon Blueberry Sauce Directions:
1. In a small saucepan warm the blueberries, water, vanilla, bourbon, and sugar over medium heat until the blueberries begin to bubble and simmer.
2. In a small bowl, dissolve 3 tablespoons of cornstarch in 1/4 cup of cold water. Add the cornstarch mixture to the blueberry sauce.
3. Cook the blueberry sauce until bubbling and thickened. Finish the sauce by adding the butter and salt, and stirring until the butter melts.
4. Use about one cup of the blueberry sauce for the cheesecake filling and reserve the remaining sauce for topping the cheesecake when serving. 

Blueberry Cheesecake Filling Directions:
1. Using a stand mixer with a whisk attachment, or a hand mixer, beat the whipping cream in a chilled bowl until stiff peaks form. Place the whipped cream in a bowl, cover, and place in the fridge.
2. In the stand mixer, using the paddle attachment, or using a hand mixer, beat the cream cheese until softened. Add the powdered sugar and vanilla extract; mix until combined.
3. Carefully fold the chilled whipped cream into the cream cheese mixture until just combined.
4. Lightly fold in one cup of the blueberry sauce into the mixture until swirled to your desired level.
5. Spoon the cheesecake filling into the chilled crust, and cover directly with plastic wrap.
6. Place the cheesecake in the refrigerator to chill and set for at least 6 hours or overnight.
7. Serve with the remaining blueberry sauce and a handful of fresh blueberries, if desired.

Grilled Coconut Shrimp with Sweet Chili Sauce

Lia Soneson

CoconutShrimp_v2_01.jpg

Grilled shrimp in the summer is such a treat! Today, we’re featuring delicate shrimp skewers with a garlic, ginger, and coconut milk marinade, topped with toasted coconut and piquant lime. Plus, we’ve included a homemade sweet chili sauce for your dipping pleasure. Fire up the grill and enjoy the tropical flavors of this delicious dish while summer is still here!


Serves 4

Shrimp Ingredients:
3 cloves garlic, minced
1/2 tablespoon fresh ginger, grated
1 tablespoon freshly squeezed lime juice
1 teaspoon lime zest
1/2 tablespoon honey
1 cup coconut milk
1/2 tablespoon soy sauce
1 lb large shrimp, peeled & deveined (about 15-20 shrimp)
1/4 teaspoon black pepper
1/2 pineapple, cut into 1" chunks

For serving:
Shredded coconut, toasted
Cilantro
Lime wedges

Sweet Chili Sauce:
1/2 cup rice vinegar
1/2 cup brown sugar
1/4 cup cold water
1 tablespoon soy sauce
1 tablespoon sambal oelek
2 cloves garlic, minced
1/2 tablespoon fresh ginger, grated
1 tablespoon corn starch, dissolved in 1 tablespoon water

Directions:
1. If using wooden skewers, soak the skewers in water for one hour, or up to one day.

2. Make the sweet chili sauce. Combine the rice vinegar, brown sugar, water, soy sauce, sambal oelek, garlic, and ginger into a small saucepan and bring to a boil, stirring constantly until the sugar has dissolved. Stir in the cornstarch mixture and continue to stir until sauce is thickened, about 1-2 minutes. Cool the sauce completely and store covered in the refrigerator until ready to serve.

3. Make a marinade by combining the garlic, ginger, lime juice, lime zest, honey, coconut milk, and soy sauce in a medium bowl. Whisk ingredients together until incorporated.

4. Place the peeled and deveined shrimp in the bowl with the marinade, and use a large spoon to gently turn and cover the shrimp until coated. Cover, and refrigerate for 15 minutes.

5. Skewer the shrimp, alternating with the pineapple, using wooden or flat metal skewers - place the shrimp close together. Discard the marinade.

6. Grill the shrimp over direct heat on a well-oiled grill. Cook for 2 minutes, then flip and cook for another 2 minutes, or until the shrimp are pink and opaque. Actual timing may vary by the size of the shrimp and the heat of the grill, so go by sight and touch.

7. Sprinkle shrimp with the shredded coconut and cilantro and serve with lime wedges and the sweet chili sauce.

Grilled Nectarine and Chicken Salad

Lia Soneson

 
GrilledSalad_v3_01.jpg

Try this truly satisfying summer salad! Grilled chicken and nectarine halves perfectly complement the crispy crunch of fresh greens. Creamy goat cheese, bright blueberries, and a homemade, herbed buttermilk dressing seal the deal for this wonderful meal!


Grilled Nectarine and Chicken Salad with an Herbed Buttermilk Dressing
Serves 4

Salad Ingredients:
2 large chicken breasts, about 1 lb boneless, thinly sliced (or 4 thinly-cut chicken breasts)
4 nectarines, halved and grilled
6 oz spring mix of spinach and arugula
4 oz goat cheese, crumbled into bite-sized pieces
1 cup blueberries, washed
1/4 small red onion, thinly sliced

Chicken Marinade:
1 teaspoon Kosher salt
1/2 teaspoon black pepper
1/2 teaspoon garlic powder
1/2 teaspoon dried basil
1/2 teaspoon dried oregano
1/4 teaspoon paprika
2 tablespoons olive oil
2 tablespoons fresh lemon juice

Herbed Buttermilk Dressing:
1 clove garlic, grated
1 tablespoon fresh parsley, minced
1 tablespoon fresh basil, minced (8-10 leaves)
1 tablespoon chives, sliced
1/2 cup buttermilk
1/2 cup Greek yogurt
2 tablespoons olive oil
2 tablespoons lemon juice
1 tablespoon white wine vinegar
1 teaspoon Kosher salt
1/2 teaspoon black pepper
1/4 teaspoon garlic powder
1 teaspoon sugar

Directions:
1. Prepare the chicken breasts by thinly slicing in half to make thinner breasts for more flavor and faster grilling. Marinate the chicken in a large bowl. Rub the chicken on all sides with Kosher salt, pepper, garlic powder, basil, oregano, and paprika. Drizzle with olive oil and lemon juice. Cover and refrigerate the chicken; marinate for 30 minutes or up to 1 hour.

2. Prepare the herbed buttermilk dressing. Peel and grate the garlic using a fine grater. Wash the parsley, basil, and chives and chop finely. In a medium-sized glass bowl, whisk the buttermilk and Greek yogurt together until well combined. Add the olive oil, lemon juice, Kosher salt, pepper, garlic powder, and sugar; mix well. Whisk in the grated garlic and chopped herbs until evenly incorporated.

3. Prepare the nectarines for grilling by washing, and slicing in half. Carefully remove the pit with a paring knife. Brush each half with olive oil.

4. Fire up the grill! When using a gas grill, prepare half of the grill with high heat while keeping the other half on low heat -- that is, use a direct/indirect set-up. Add the chicken to the cooler side of the well-oiled grill and close the lid. After 4-5 minutes, turn once and cook an additional 4-5 minutes. Continue to grill and flip, as needed, until the thickest part of the breast reaches 160°F. After removing the chicken from the grill, the heat in the chicken breast will continue to rise until it hits the food-safe temperature of 165°F. Let the chicken rest for 5 minutes, then cut into slices.

5. Grill the nectarine halves flesh-side down over medium-high heat for 3 to 4 minutes or until grill marks appear.

6. Assemble the salad! Layer the greens and red onion with a drizzle of the herbed buttermilk dressing. Top the salad with the grilled chicken slices, grilled nectarine halves, goat cheese crumbles, and blueberries. Garnish with fresh chives, if desired.


Fresh Tomato Tart

Lia Soneson

 
Tomato_Tart_v6_01.jpg

Peak tomato season is upon us! A tomato tart is a unique and delicious way to showcase this summertime star. This dish features a Parmesan cheese crust layered with whipped ricotta and finished with slices of heirloom tomatoes and fresh basil. Enjoy this tomato tart with a simple side salad for a delightful lunch or dinner!


Fresh Tomato Tart
Makes one 9-inch square tart

Parmesan Crust Ingredients:
1-1/4 cups flour
1/2 teaspoon Kosher salt
1/4 teaspoon freshly ground pepper
1 cup Parmesan cheese, grated
1/2 cup cold, salted butter, cut into cubes
1-3 tablespoons ice water

Whipped Ricotta Filling Ingredients:
8 oz fresh ricotta cheese
1 tablespoon olive oil
1 teaspoon fresh lemon juice
1 teaspoon lemon zest
1/4 teaspoon Kosher salt

Topping Ingredients:
3 large heirloom tomatoes, sliced
Salt for tomatoes
Basil, chiffonade cut for garnish
Lemon zest, for garnish
Reduced balsamic vinegar, drizzled for garnish
Kosher or flake salt for garnish

Directions:

1. Prepare the crust. Using a food processor, pulse the flour, salt, pepper, and Parmesan cheese together until combined. Add 1/2 of the cubed butter and pulse until the texture is as coarse as cornmeal. Add the remain- ing butter and pulse a few times leaving some pieces the size of small peas. Slowly drizzle the water in one tablespoon at a time, and pulse until the dough forms. Avoid adding too much water.

2. Pat the dough into a disc form and wrap with plastic wrap. Refrigerate for at least one hour.

3. Meanwhile, prepare the whipped ricotta filling. In a food processor or high-powered blender, whip the ricotta with the olive oil, fresh lemon juice, lemon zest, and salt until a very smooth texture is formed.

4. Prepare the topping ingredients. Slice the tomatoes into 1/4”-thick slices, and place on a paper towel-lined sheet pan. Sprinkle the slices with Kosher salt and let them rest for a few minutes to release excess juices. Slice the basil into a chiffonade cut for a garnish. Zest a lemon to use as a garnish, as well.

5. Preheat the oven to 375°F. Roll out the crust on a flour-dusted work surface. Place the crust in a greased tart pan and trim the edges. Place pie weights inside the tart crust and bake for 15-20 minutes. Remove the pie weights and continue baking an additional 15-20 minutes or until the crust springs back when touched, and has turned a light golden hue. Allow the crust to cool completely on a cooling rack.

6. Assemble the tart once the crust has cooled completely. Spread the whipped ricotta on the baked crust. Top the ricotta layer with the tomato slices. Garnish with the basil, lemon zest, a pinch of salt, and a drizzle of reduced balsamic vinegar. Serve immediately. Enjoy with a simple side salad, if desired.