Contact Us

Use the form on the right to contact us.

You can edit the text in this area, and change where the contact form on the right submits to, by entering edit mode using the modes on the bottom right. 

2210 Haines Avenue
Rapid City, SD, 57701
United States

605-341-5044

Someone's In the Kitchen is an independent, gourmet kitchenware store in Rapid City, South Dakota. We are your shop for "all things kitchen". Enjoy a leisurely shopping experience in the world of kitchen and home.

RECIPE ARCHIVE IV

Peach and Blackberry Pie

Lia Soneson

There's no sweeter way to enjoy beautiful summer fruits than to pile it high into a flavor-packed pie! Fresh peaches and ripe blackberries are celebrated in this summer pie nestled inside a classic, flaky Pâte Brisée crust. Bright, citrus lemon flavors balance the warming notes of ginger and cardamom in a delicious and flavorful dessert that keeps delivering with every bite.


Peach and Blackberry Pie
Serves 8

Pâte Brisée Crust Ingredients:
2-1/2 cups all-purpose flour, (plus, extra for dusting)
1 tablespoon sugar
1-1/2 teaspoons Kosher salt
1 cup unsalted butter (2 sticks), well chilled
4-6 tablespoons ice water,(plus more if needed)
1 egg beaten, for egg wash used when attaching the lattice crust
Turbinado or raw sugar to finish

Peach Blackberry Filling Ingredients:
1 tablespoon fresh lemon juice (about 1/2 lemon)
1/2 tablespoon grated lemon zest
1-1/2 teaspoons vanilla extract
1" knob fresh ginger, finely grated
6 medium peaches peeled, pitted, and cut into 3/4” thick slices
16 oz fresh blackberries
1/4 cup cornstarch
1/2 cup granulated sugar
1/2 cup light brown sugar
1/8 teaspoon cardamom
1/4 teaspoon Kosher salt
2 tablespoons chilled unsalted butter cut into 1/2" pieces
Vanilla ice cream (for serving)

Directions:

1. Prepare the Crust. Place the flour, sugar, and salt in the bowl of a food processor. Pulse a few times to evenly distribute.

2. Cut the butter into 1/2-inch cubes. Use a little of the flour mixture to keep the butter pieces from sticking together. Chill the cut butter cubes for 15 minutes.

3. Prepare the ice water by filling a small bowl with ice cubes and adding water. Stir until the water is well-chilled.

4. Place the butter cubes into the food processor with the flour mixture. Pulse 4-5 times to cut the butter into the flour. The flour-butter mixture will be coarse with some pea-sized pieces of butter remaining. (Resist the urge to keep pulsing.)

5. Add 2 tablespoons of the ice water by sprinkling on top of the flour and butter mixture. Pulse 2-3 times. Continue adding ice water by the tablespoon pulsing after each addition until a rough dough is formed. Test the dough by pinching together – if it holds together, enough water has been added. If it crumbles apart, add another tablespoon of water. (Avoid adding too much water, or pulsing too much.)

6. Remove the dough from the food processor, and gather it into a rough ball. Flatten the dough ball into two disks about a half-inch in thickness and wrap in plastic wrap. Chill for 1 hour.

7. Roll one of the discs into a 12-inch circle and line a 9-inch pie plate. Trim any excess crust from the edges reserving the trimmings for later addition to the edge. Press the crust around the rim of the pan to form a smooth edge. Use a fork to prick the bottom of the crust all over. Chill while preparing the filling.

8. Make the Filling. In a large bowl, combine the lemon juice, lemon zest, vanilla extract, and fresh ginger. Add the peaches and blackberries and toss to coat.

9. In a small bowl, combine the cornstarch, granulated sugar, brown sugar, cinnamon, and salt. Use a fork to incorporate the dry ingredients together. Sprinkle the dry mixture over the peaches and berries using a wooden spoon to gently toss the peaches and berries until evenly coated. Set aside.

10. Make the lattice top by rolling out the remaining pie dough disk into a 13" round with 1/8" thickness. Cut 1" wide strips. Remove the chilled filled pie pan from the refrigerator and use a large slotted spoon to scoop the filling into the pie, spreading the fruit evenly throughout. Add a few teaspoons of juices back into the pie that may have settled to the bottom of the bowl. Dot the top of the filling with the butter cubes.

11. Lay 5 lattice strips over the top of the filled pie, spacing them evenly apart. One at a time, with the remaining strips, start in the middle and working outward, weave the strips perpendicularly through the first layer, using an over and under technique. Trim any excess dough away from the lattice strips. Brush the edge with an egg wash including underneath the lattice strips. Lightly press the lattice strips into the crust’s edge just enough to stick them in place. Roll the excess dough (from trimming the bottom crust and from the lattice strips) into a long rope and place on the perimeter of the pie. Form a fluted edge by pinching the edge crust -- the bottom, the lattice, and the “rope.” Apply additional egg wash over the edge again, and on top of the lattice strips. Sprinkle with the raw sugar.

12. Place the pie on a rimmed baking sheet and chill in the freezer for 20 minutes.

13. Preheat the oven to 375°F. Remove the pie from the freezer and bake for 1 hour 30 minutes, covering with a pie shield halfway through baking if necessary to ensure that the crust doesn't burn. The pie is ready when the crust has nicely browned and the fruit juices are bubbling.

14. Cool on a wire rack for at least 1 hour before serving. Serve with vanilla ice cream if desired.

Chicken Caesar Club Wraps

Lia Soneson

Looking for something heartier than a salad, but still chock full of veggies? Try a wrap! This grilled chicken Caesar club wrap is loaded with all of everyone’s favorite goodies. Also, learn some key tips for a quick Caesar dressing. And, that’s a wrap!


Chicken Caesar Club Wraps
Serves 4

Chicken Ingredients:
2 chicken breasts
2 tablespoons olive oil
2 tablespoons fresh lemon juice
1/2 teaspoon each of Kosher salt, pepper, and oregano for marinating the chicken

Wrap Ingredients:
6 slices bacon, cooked and crumbled
2 cups romaine lettuce, chopped
1 cup cherry tomatoes, halved
4 ounces shaved parmesan cheese
4 tortillas
2 avocados, sliced

Caesar Dressing Ingredients:
1 clove garlic, grated
2 tablespoons fresh lemon juice
1 teaspoon Dijon mustard
1 teaspoon Worcestershire sauce
1/4 cup whole milk Greek yogurt
3 tablespoons mayonnaise
1 teaspoon anchovy paste (optional)
3 tablespoons olive oil
1/4 teaspoon Kosher salt
1/4 teaspoon black pepper

Directions:

1. Marinate the chicken in olive oil, lemon juice, salt, pepper, and oregano for 15-20 minutes. Meanwhile, preheat the grill.

2. Grill the chicken breast for 4-5 minutes, then flip with grill tongs. Continue grilling the chicken until the thickest part of the breast reaches 165° F. Remove the chicken from the grill, and let it rest for 5 minutes, then cut into thin slices.

3. Cook the bacon in a skillet, remove once crispy. Drain on a paper towel-lined plate.

4. Chop the romaine and halve the tomatoes. Halve and slice the avocados.

5. Shave the cheese.

6. Whisk all of the dressing ingredients together in a small bowl until combined.

7. In a large bowl toss the lettuce with the dressing.

8. Warm the tortillas in the microwave slightly, then fill each tortilla with the lettuce, grilled chicken, tomatoes, cheese, avocado, and bacon. Drizzle with extra dressing, if desired.

9. Wrap each filled tortilla securely (like a burrito). Use toothpicks, if needed to secure, then cut in half and enjoy immediately!

White Gazpacho

Lia Soneson

Gazpacho is the ultimate summer delight. Often overlooked, this lunch or dinner soup is refreshing, cool, and surprisingly filling. We love this twist on the classic red -- this one that features a citrusy, nutty profile that elevates everyday fruits and vegetables into a delicate and complex dish -- one that proves, again, that the sum is often better than its parts. Just grab a spoon!


White Gazpacho
Serves 4 - 6

Ingredients:

1 whole bulb garlic
1/2 tablespoon olive oil, plus 1/4 cup olive oil
1 zucchini
2 English cucumbers
1/3 cup plain yogurt
2 tablespoons freshly squeezed lemon juice
1/4 cup cashews
1 cup seedless green grapes
1/2 teaspoon Kosher salt
1/4 teaspoon black pepper
2 cups French bread, cubed
2-4 tablespoons water to thin, as needed

Directions:

1. Preheat the oven to 400°F. Use a sharp knife to cut 1/2” off of the top of the garlic bulb to expose the individual cloves. Place the garlic in aluminum foil and drizzle with 1/2 tablespoon olive oil. Wrap the garlic in the aluminum foil, keeping the cut side up. Roast the garlic in a preheated oven for 30-40 minutes until the cloves are soft and golden brown. Let the garlic cool completely. Remove 8 cloves to use for the gazpacho.

TIP: Roasted garlic may be roasted and refrigerated one day prior to making the gazpacho.

TIP: Spread leftover roasted garlic on toasted bread for a delicious treat.

TIP: To keep from warming your kitchen during hot summer days, use a toaster oven to roast the garlic. This will create less heat and may be more energy efficient.

2. Peel and cube the zucchini. Peel the cucumbers, use a spoon to remove the seeds, and chop into 2" sections.

3. Combine the cloves of roasted garlic, olive oil, zucchini, English cucumbers, yogurt, lemon juice, cashews, grapes, salt, and pepper in a high-powered blender and blend until the ingredients are fully incorporated. Slowly add the cubed bread until the gazpacho is silky smooth. Add the water 1 tablespoon at a time as needed, to help thin the gazpacho to a desired consistency.

4. Chill the gazpacho in the refrigerator for at least 30 minutes, or up to one day. Serve very cold.

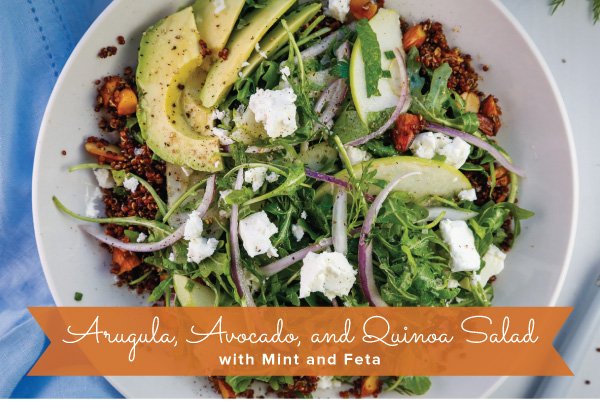
Arugula, Avocado, and Quinoa Salad with Mint and Feta

Lia Soneson

Fresh summer greens are happily celebrated in this easy-breezy salad. Mixed with nutty-tasting quinoa and tangy feta, the spicy arugula and avocado flavors spring to life in this hearty salad that’s packed with fresh herbs and topped with a zingy lemon vinaigrette.


Arugula, Avocado, and Quinoa Salad with Mint and Feta
Serves 4

Salad Ingredients:
1 cup red quinoa
2 cups vegetable stock
1 tablespoon butter
1 tablespoon olive oil
1/2 cup almonds, coarsely chopped
1/2 teaspoon Kosher salt
4 heaping cups arugula
1 avocado
1 green apple
1/2 small red onion
1/4 cup fresh mint, coarsely chopped
1/4 cup fresh Italian parsley, coarsely chopped
1/4 chives, minced
1/4 cup fresh dill, coarsely chopped
6 oz feta cheese
Additional flaky sea salt for garnishing

Dressing Ingredients:
1/3 cup olive oil
2 tablespoons lemon
1/2 tablespoon honey
1 clove garlic, minced
1/4 teaspoon Kosher salt
1/4 teaspoon freshly cracked black pepper

Directions:

1. In a medium pot, bring the vegetable stock to a boil, add the quinoa, cover, and reduce the heat to a low simmer for 15 minutes, stirring occasionally. Quinoa is done when the liquid has been absorbed and the quinoa is tender. Remove from heat and set aside.

2. In a small skillet, melt the butter and olive oil over medium heat. Add the chopped almonds and toast for 3-4 minutes until slightly brown and nutty smelling. Sprinkle with the salt and stir once more. Toss the almonds into the quinoa and set aside to cool.

3. Prepare the dressing by whisking all of the dressing ingredients together in a small bowl or wide-mouthed jar.

4. Prepare the avocado: remove the pit, peel, and slice. Thinly slice the green apple and the red onion.

5. Toss the quinoa with half of the dressing. In a separate, large bowl, toss the remaining dressing over the arugula, avocado, green apple, red onion, mint, parsley, chives and dill. Combine the quinoa with the greens and sprinkle with feta and flake salt. Serve immediately.

Our Flavorful Dry Rub on Grilled Pork Tenderloin

Lia Soneson

Fire up the grill and make a small batch of dry rub for Dad! This dry rub is easy to mix and yields quick and delicious grilling results all summer long! Try this dry rub on grilled pork tenderloin, (like our featured recipe below), or on pork loins, ribs, or even a whole chicken!


Our Flavorful Dry Rub on Grilled Pork Tenderloin
Makes 1-1/2 cups of rub -- Tenderloin serves 4-6

Dry Rub Ingredients:
2 tablespoons black pepper
2 tablespoons Kosher salt
3 tablespoons brown sugar
2 teaspoons cayenne pepper
2 tablespoons chili powder
2 tablespoons ground cumin
1 tablespoon ground oregano
4 tablespoons paprika
1 tablespoon garlic powder
1/2 tablespoon onion powder
1 tablespoon dry mustard

Dry Rub Directions:
1. Measure all of the ingredients into a small bowl. Whisk until well-combined.
2. Transfer the dry rub to a storage container with a tight-fitting lid. Store for up to six months.

Pork Tenderloin Ingredients:
2 pork tenderloins (2 lbs each)
4 tablespoons dry rub, (2 tablespoons per tenderloin)
Favorite BBQ sauce, for serving

Directions:

1. Rub each tenderloin with 2 tablespoons of dry rub. Pat the rub all over the tenderloin, and let the meat warm to room temperature for about 20-30 minutes before grilling.

2. Meanwhile, fire up the grill! Set up a direct/indirect grill on half the grill. Make sure your grill grates are cleaned and well-oiled.

3. Once the grill is well-heated, place the tenderloins on the direct heat side. Let the meat sear for 5 minutes, then flip to the other side for another 5 to 7 minutes. If the pork begins to get overly seared, move to the indirect side of the grill. Cook until the internal temperature reaches 145 degrees F.

4. Remove the tenderloins from the grill, and loosely cover with a piece of aluminum foil. Allow the meat to rest for 10 minutes before slicing.

5. Slice and serve with your favorite BBQ sauce.

6. Serve with your choice of sides. We like the quick option of grilled veggies and a microwave-baked potato.

Tip: To make grilled mini peppers and green onions, simply toss the veggies with olive oil, Kosher salt, and pepper, and grill until tender.

Fresh Strawberry Cupcakes with Strawberry Buttercream Icing

Lia Soneson

These adorable pink cupcakes are bursting with strawberry flavor! The vanilla cupcakes are baked with plenty of diced fresh strawberries, while the buttercream frosting features freeze-dried strawberries that lend a sweet-tart flavor, and a perfect pink color. Try our recipe - these petite cakes will delight kids and adults alike!


Fresh Strawberry Cupcakes with Strawberry Buttercream Icing
Makes 22-24 cupcakes

Cake Ingredients:2 cups all-purpose flour
2 teaspoons baking powder
1/2 teaspoon salt
12 tablespoons (1-1/2 sticks) butter
2 cups sugar
2 large eggs
1 teaspoon pure vanilla extract
3/4 cup sour cream
1/2 cup whole milk
1 cup strawberries, 1/4-inch dice, dusted with 2 tablespoons of flour

Directions:

1. Preheat the oven to 350°F. Lightly grease the top of the cupcake pan with a bit of vegetable oil, then place cupcake liners in two 12 count cupcake pans (for 24 cupcakes).
2. Using a whisk, combine the dry ingredients (flour, baking powder, and salt) together in a large bowl mixing until evenly combined with no visible lumps. Set aside.
3. Combine the wet ingredients (vanilla, sour cream, and milk) in a separate bowl or larger glass measuring cup. Set aside.
4. In a large stand mixer, cream the butter and sugar together for 3-5 minutes until smooth and creamy.5. Add the eggs one by one to the creamed butter, mixing after each addition until fully incorporated.
6. Alternate adding the remaining wet and dry ingredients, beginning and ending with the flour mixture and beating until just blended. Do not over mix, but make sure that the batter is smooth, and not lumpy. Fold in the diced strawberries until just combined.
7. Transfer the batter to the prepared cupcake pans by using a cookie scoop or large spoon. Fill each liner about 2/3 full.
8. Bake for 20-22 minutes, or until the cake springs back from a light touch, or when a toothpick inserted in the center returns cleanly.
9. Remove the cupcakes from the baking pan and place on a cooling rack to cool completely.
10. Frost the cooled cupcakes creatively! We used a large star tip (for example, a Wilton 2G) for making large swirls.
11. Garnish with a fresh or freeze-dried strawberry half or slice. Serve immediately.

Strawberry Buttercream Icing
Ingredients:
1 pound (4 sticks) unsalted butter, room temperature
7 cups powdered sugar
1 ounce freeze-dried strawberries, blended and sifted
3 tablespoons heavy cream
1 tablespoon vanilla extract

Directions:
1. Blend the freeze-dried strawberries into a fine powder using a small food processor. Sift the powder through a sifter or a fine-mesh strainer to remove any larger chunks.
2. Using a stand mixer, beat the butter for 5 minutes until it turns a pale yellow and has a smooth, silky consistency. Add the vanilla and beat for an additional 30 seconds until well-combined.
3. Sift the powdered sugar once to remove any lumps. Add half of the powdered sugar to the creamed butter, and whip for 3-5 minutes until the icing looks fluffy. Then add the remaining half of the sugar, and mix for an additional 3-5 minutes, or until fully and incorporated with a whipped consistency.
4. Add the heavy cream and freeze-dried strawberry powder. Make sure to scrape down the sides of the bowl occasionally with a spatula to ensure all the ingredients are evenly mixed.
5. Use a frosting bag and tip of your choice to decorate the strawberry cupcakes.

Classic Potato Salad

Lia Soneson

This classic potato salad recipe features all of the best add-ins! With red potatoes as the base, this recipe features mini dill pickles that add a briny tang, celery for wonderful crunch, hard boiled eggs for richness and depth, and crispy bacon for a top garnish. This recipe is picnic perfect, and sure to be a family favorite all summer long!


Classic Potato Salad
Serves 6 - 8

Ingredients:
1/4 cup red onion, finely diced
2 tablespoons white vinegar
3 pounds red potatoes, skin on, cut into 1/2” dice
5 hard boiled eggs, peeled and chopped
5 slices bacon, cooked & crumbled for garnish
2 celery stalks, diced1/4 cup mini dill pickles, diced
1/2 cup mayonnaise
1/2 cup sour cream
1 tablespoon Dijon mustard
1/2 teaspoon celery seed
1 teaspoon sugar
1 teaspoon Kosher salt
1/2 teaspoon garlic powder
1/2 teaspoon pepper
5 chives, minced, for garnish

Directions:
1. Finely dice the red onion, then soak the diced onion in the white vinegar while prepping the rest of the potato salad. This step mellows out the onion flavor in the final dish.
2. Wash and dice the potatoes, then boil in heavily salted water for about 10-12 minutes or until just fork-tender. Drain the cooked potatoes and then cool to room temperature on a large sheet pan.
3. Meanwhile, boil the eggs. Place cold eggs in a saucepan, add cold water, enough to cover by at least one inch. Bring the water and eggs to a boil over high heat covering the saucepan with a lid. Once the water boils, remove from heat and let stand for 12 minutes – set the timer! (It’s the extended exposure to heat that turns the yolks green.) After the 12 minutes are completed, pour out the hot water and replace with ice-cold water. As the cold water warms from the eggs, replace with more cold water. Let the eggs cool, then peel and chop.
4. Cook the bacon in a skillet until crispy, drain on a paper-towel lined plate and then crumble for a garnish.
5. Dice the celery and mini dill pickles.
6. In a medium bowl, whisk together the dressing ingredients: mayonnaise, sour cream, Dijon, celery seed, sugar, Kosher salt, garlic powder, and pepper. Whisk in the vinegar and the soaked red onions, and stir until the dressing is well-combined.
7. Add the cooked and cooled potatoes to a large bowl, add the celery, pickles, and chopped hard boiled eggs. Mix carefully with the dressing until combined and coated with dressing.
8. Garnish with the cooked bacon crumbles and chives just before serving.

Grilled Mahi-Mahi with Pineapple-Mango Salsa & Roasted Garlic Rice

Lia Soneson

Bold spices elevate sweet and flaky mahi-mahi in this satisfying dish. Add fresh pineapple-mango salsa, and a side of hearty, roasted garlic rice. Everyone at the table will be dazzled and very happy.


Grilled Mahi-Mahi with Pineapple-Mango Salsa & Roasted Garlic Rice
Serves 4

Pineapple-Mango Salsa Ingredients:
1 cup fresh pineapple, diced
1 mango, diced
1/4 red onion, finely diced
1/2 small jalapeño, minced
1 lime, juiced and zested (reserve zest for the rice below)
1 tablespoon olive oil
1/2 cup fresh cilantro, chopped
1/2 teaspoon Kosher salt

Roasted Garlic Rice:
1 whole head garlic
2 tablespoons olive oil, divided
1 cup white rice
2-1/4 cups vegetable broth
1/2 teaspoon Kosher salt
1/4 teaspoon cumin Zest of one lime (from salsa ingredients above)

Mahi-Mahi Ingredients:
1 teaspoon smoked paprika
1/2 teaspoon Kosher salt
1/2 garlic powder
1/4 teaspoon black pepper
1/4 dried oregano
1/4 cayenne
2 tablespoons olive oil
1 lb mahi-mahi

Directions:
1. In a small bowl, combine all of the salsa ingredients, stirring gently to incorporate. Cover and set aside.

2. Preheat an outdoor grill to medium high heat. Slice 1/2” off of the top of the garlic bulb to expose the individual cloves. Place the garlic bulb, cut side up, on a piece of aluminum foil and pour one tablespoon of the olive oil over the top of the exposed cloves. Wrap the garlic bulb in the foil and place on the grill, over indirect heat. Grill for 40 minutes until the cloves are browned and caramelized. Tip: Keep the foil opening facing UPRIGHT so the oil does not spill out.

3. While the garlic roasts, prepare the rice. In a fine mesh strainer, rinse the rice under cold water until the water is clear. In a medium-sized saucepan with a lid, add the vegetable broth, 1 tablespoon olive oil, salt, and cumin to the rice and bring to a boil. Once boiling, turn the heat to low and cover with the lid. Simmer the rice on low for 15-20 minutes, or until the rice grains become tender and the liquid has been absorbed. Remove the rice from heat, and let sit for 5 minutes.

4. In a small bowl, combine the paprika, salt, garlic powder, pepper, onion powder, oregano, and cayenne until blended. Rub the mahi-mahi with the olive oil and coat it evenly with the seasoning, covering as much of the surface area as possible.

5. Grill the mahi-mahi until firm, about 3-5 minutes on each side gently flipping with a fish turner so as not to damage or break the delicate fish. The internal temperature should be 145 degrees F.

6. Use a small seafood fork to remove the garlic cloves from the papery peel. Use a fork to fluff the rice and stir in the lime zest and the grilled garlic.

7. Serve the grilled mahi-mahi over a bed of rice and top with the pineapple mango salsa. Enjoy immediately.

Flank Steak Fajitas and Classic Guacamole

Lia Soneson

Flank steak on the grill is always the right answer to "what's for supper?" Our featured marinade adds great flavor to the steak. Simply grill the steak along with some peppers and onions and you'll have the perfect fajita dinner ready to serve! This meal is easy to accomplish with most of the cooking time spent at the grill. PLUS, get our very favorite, classic guacamole recipe to top it all off!


Flank Steak Fajitas and Classic Guacamole
Serves 6

Fajita Ingredients:
1 (2 lbs) flank steak
6-12 large flour tortillas, warmed
3 bell peppers (a mix of red, orange, yellow), sliced into strips
2 sweet onion, sliced pole to pole
2 tablespoons olive oil
1/2 teaspoon Kosher salt
1/2 teaspoon pepper

Marinade Ingredients:
zest of one lime
1 tablespoon fresh cilantro,
minced1/4 cup fresh lime juice
1/2 cup vegetable oil
1/8 cup soy sauce
1 teaspoon chili powder
1 teaspoon garlic powder
1 teaspoon paprika
1 teaspoon cumin
1 teaspoon dried oregano
1 tablespoon sugar
1 teaspoon pepper
1 teaspoon Kosher salt

Toppings: Guacamole, Sour cream, Cilantro

Fajita Directions:

1. Whisk the marinade ingredients together until combined, then pour over the flank steak. Chill and marinate in a sealed container or bag for 2 hours. Allow the steak to come to room temperature for about 20 minutes prior to grilling.

2. Prepare the veggies in a large bowl, toss the sliced peppers and onion with the olive oil, Kosher salt, and pepper. Grill the peppers and onion in a grill basket over direct heat or sauté in a skillet on the stovetop. Stir the vegetables often and cook until slightly charred in spots and cooked to your desired tenderness.

3. Grill the steak! Fire up the grill, preheat the grill to high. Place the steak on the grill, and cook for 3-4 minutes. Flip and cook for another 3-4 minutes. Continue grilling and flipping until the internal temperature reaches 135°F for medium-rare.

4. Remove the steak from the grill, and let it rest for 10 minutes to let the juices set and reabsorb. Slice the steak against the grain.

5. Serve the grilled steak and vegetables with warmed tortillas and a variety of your favorite toppings. We recommend topping with our classic guacamole (see our recipe above).

Guacamole Ingredients:
4 ripe avocados2 roma tomatoes, diced
1 tablespoon sweet onion, minced
1 clove garlic, minced
1 jalapeño, seeded and finely diced
2 tablespoons fresh cilantro, chopped
1/4 teaspoon cumin
juice of 2 small limes, more to taste
Kosher salt and pepper, to taste

Guacamole Directions:

1. Split, pit, and scoop out the avocados. Using a fork or avocado masher, mash until coarsely mashed.
2. Add the tomatoes, onion, garlic, jalapeño, cilantro, cumin, and lime juice. Stir until combined.
3. Season the guacamole with Kosher salt and pepper, to taste. Adjust the amounts of lime juice, cumin, and cilantro according to your preference.

Glazed Lemon Cake with Fresh Berries

Lia Soneson

Bright, citrusy lemon cake may just be the perfect way to celebrate moms and special mother figures in your life this weekend. Nothing feels quite as springy as this slightly sweet, beautifully dense, zesty cake adorned with a gorgeous drizzled glaze. Serve this wonderful cake with freshly macerated berries -- it's guaranteed to be a hit!


Glazed Lemon Cake with Fresh Berries
Makes 1 Cake - Serves 10-12

CAKE INGREDIENTS:
1-3/4 cups granulated sugar
1/2 cup lemon zest (about 4 lemons)
1 cup (2 sticks) unsalted butter, softened
4 large eggs
2 tablespoons fresh lemon juice
1-1/2 teaspoons vanilla extract
3/4 cup plain Greek yogurt
1/2 cup full fat buttermilk
3 cups all-purpose flour, divided, plus more for dusting the bundt pan
1 tablespoon baking powder
1/2 teaspoon Kosher salt

GLAZE INGREDIENTS:
2-1/3 cups powdered sugar, plus 1 additional tablespoon for dusting
3 tablespoons freshly squeezed lemon juice

TOPPINGS:
1 cup strawberries, stems removed and halved
1/2 cup blueberries
1/2 cup raspberries
2 tablespoons granulated sugar

DIRECTIONS:

1. Preheat the oven to 350°F. Grease and flour a 12-cup bundt pan, tapping out any excess flour as needed.

2. In a medium bowl, add the sugar and lemon zest. Rub the zest and sugar together with your fingers to release the oils of the lemon zest until the sugar is quite fragrant and slightly damp, about 1 minute.

3. In a stand mixer outfitted with the paddle attachment, cream the butter and the infused sugar together on medium-high speed until the mixture is fully incorporated, about 3-5 minutes. Scrape down the sides of the bowl as needed, to ensure even mixing.

4. Reduce the speed to low and slowly add the eggs, lemon juice, vanilla extract, Greek yogurt, and buttermilk until ingredients are evenly combined.

5. In a separate bowl, sift the flour, baking powder, and salt. Stir until evenly distributed. Gradually add the dry ingredients to the wet ingredients, mixing on medium speed until fully combined.

6. Pour the lemon batter into the prepared bundt pan, using a spatula to smooth the top surface. Bake for 50-60 minutes until the cake is golden brown and a knife comes out mostly clean when inserted, displaying only a few soft, lingering crumbs.

7. While the cake bakes, macerate the strawberries, blueberries, and raspberries by combining them in a small bowl and tossing with the sugar. Set aside.

8. Once fully baked, cool the cake in the pan on a cooling rack for about 15 minutes, then carefully flip the bundt pan onto the wire rack. Allow the cake to cool completely before adding the glaze.

9. Make the glaze by combining the powdered sugar and lemon juice in medium bowl and whisking until smooth. Drizzle the glaze over the cake and let stand for about 15 minutes to allow the glaze to set.

10. Slice and serve with the fresh berries.This tangy, dense cake is lovely when paired with coffee or tea at breakfast, or when served as the perfect ending to any meal. Leftover cake can be stored wrapped well, and at room temperature for up to 5 days.

Homemade Fettuccine with Crispy Prosciutto, Peas, Mushrooms, and Asparagus

Lia Soneson

It's no secret -- pasta is universally loved! With a few key ingredients and handy kitchen tools, making primo pasta is easier than you think! The homemade pasta is adorned with spring asparagus, peas, and crispy prosciutto on top. Get ready to enjoy some fresh pasta and delightful flavors!


Homemade Fettuccine with Crispy Prosciutto, Peas, Mushrooms, and Asparagus
Serves 4-6

Homemade Pasta Ingredients:
1-1/2 cups all-purpose flour
1/2 cup semolina flour
3 eggs
1/2 teaspoon salt

Sauce Ingredients:
2 tablespoons olive oil
4 ounces of thinly sliced prosciutto
2 tablespoons butter
1 large shallot, minced about 3 tablespoons
8 ounces mushrooms, sliced (we used a mix of cremini and shiitake)
1 cup frozen or fresh shelled green peas
12 ounces fresh asparagus, trimmed and sliced in 1-inch diagonal pieces
1/2 cup white wine
1 cup chicken stock
1/2 cup Parmesan cheese, shaved
Kosher salt and pepper, to taste

Directions:

1. Add all-purpose flour, semolina flour, and salt to a food processor and pulse to evenly combine. Add three eggs, and pulse a few times until a rough dough ball forms.

2. Empty bowl onto a floured work surface and knead a few times until a smooth dough ball is formed.

3. Let ball of pasta dough set covered under an inverted bowl, or in plastic wrap for 15 minutes to promote relaxation of the flour’s gluten. The dough may be left to rest longer, up to 30 minutes. As it rests, it will become increasingly softer and easier to roll into the required thin sheets needed for the fettuccine.

4. Divide the pasta dough into two portions with a dough cutter or knife. Dust the working surface with flour, and flatten one portion of the dough into a disc.

5. Using a pasta machine or pasta attachment, set the rollers to the widest setting. While cranking, feed the disc of dough into the rollers. Continue cranking evenly until the entire portion has been rolled out. Dust each side of the rolled pasta dough with a small amount of flour, as needed. Reduce the width of the rollers to the next thinner setting. Feed the dough through the rollers again. Repeat the narrowing of the rollers and rolling of the dough until the dough is about 1/8” in thickness (this was about a number 6 on our machine). Once the dough sheet reaches this thin stage, change to the cutting roller. Feed the sheets into the machine resulting in fettuccine ribbons. Sprinkle the pasta pieces with flour and hang to dry on a pasta rack, or dust with flour and wrap into small nests and place on a floured baking sheet to dry for at least 30 minutes.

6. While the fresh pasta is drying, prepare the rest of the pasta dish. In a large skillet or braiser, heat the olive oil and cook the prosciutto until crispy. Remove the prosciutto once crispy and set aside.

7. Add the butter to the skillet and sauté the shallot until almost translucent. Add the mushrooms and cook until slightly browned on all sides. Add the white wine and chicken stock, and let the sauce reduce down to half of its volume.

8. In a large pasta pot, boil salted water, and cook the fresh pasta for 2-4 minutes, or until the pasta starts to float to the top.

9. While the pasta boils, add the asparagus and peas to the sauce. Stir, and cook the vegetables until they are just crisp tender.

10. Once the pasta has cooked, drain well reserving one cup of the water. Add the cooked pasta to the sauce, and stir with 2 additional tablespoons of butter. Add up to 1 cup of the reserved pasta water and stir until the pasta is coated with the sauce.

11. Serve immediately with a healthy garnish of shaved Parmesan cheese and the crispy prosciutto.

Mushroom, Gruyère & Thyme Tart

Lia Soneson

Nutty-flavored Gruyère and sautéed crimini and shiitake mushrooms find the perfect home nestled atop a homemade crust in this satisfying tart. Enjoy it for a savory breakfast, or cut a slice and serve alongside a fresh salad for dinner. No matter when it's consumed, you'll be hard pressed to stop at a single piece!


Mushroom, Gruyère & Thyme Tart
Makes one tart

Crust Ingredients:
2 cups all purpose flour
1/3 cup finely grated Parmesan
1 teaspoon Kosher salt
1 cup unsalted butter (2 sticks), chilled
1/4 cup ice water, plus 1-2 additional tablespoons (as needed)

Filling Ingredients:
1 tablespoons olive oil
3 tablespoons butter, divided
1 red onion, thinly sliced
2 cloves garlic, minced
1-1/2 lbs assorted mushrooms (such as crimini, shiitake, and oyster), cleaned and thinly sliced
1/2 teaspoon Kosher salt
1/4 cup Marsala wine
1 tablespoon fresh thyme
2 eggs
1/3 cup half-and-half
4 oz. Gruyère cheese, grated
2 oz. Parmesan, grated
Mixed baby greens (for serving)

1. Make the crust by whisking together the flour, Parmesan, and salt. Cut the cold butter into 1/4" slices and gradually add it to the flour mixture, tossing often to coat, breaking the butter into smaller pieces while mixing. Gradually add the ice water into the flour mixture, about 1 tablespoon at a time, tossing to obtain an even consistency. The dough will be shaggy with small pieces of butter evident.

2. Knead the dough a couple times just until it comes together to make a ball. Flatten the ball into a disc roughly 1" thick and wrap it in plastic wrap. Chill the dough in the refrigerator for at least one hour or overnight.

3. In a large skillet, heat the olive oil and 1 tablespoon butter together over medium heat. Add the onion and cook, stirring often until the onion begins to brown, roughly 10 minutes. Transfer the cooked onion to a large mixing bowl and set aside.

4. In the same skillet, heat the remaining 2 tablespoons of butter and add the garlic, cooking for about 1-2 minutes, or until nicely fragrant. Add the sliced mushrooms and salt, and cook, stirring occasionally, until the pan begins to become dry and the mushrooms begin to brown, about 13-15 minutes.

5. Add the Marsala wine to the mushrooms and cook until no liquid remains, about 5-7 minutes. Add the fresh thyme and cook for another minute. Remove from heat and set aside.

6. Preheat the oven to 375°F. Combine the mushrooms with the onions and stir in the eggs, half-and-half, Gruyère, and Parmesan. Pour the filling into the chilled tart crust, and bake in the oven for 35-45 minutes, or until the crust is golden and the egg has set.

7. Slice and serve immediately. Pair with a side of mixed baby greens.

Vanilla Almond Meringues

Lia Soneson

Nothing says springtime in the kitchen quite like a classic meringue cookie! This light, airy treat, with just a slight chewiness on the inside, graces any platter and becomes a favorite of everyone. These irresistible morsels require only a few ingredients and a couple of easy techniques.


Vanilla Almond Meringues
Makes about 40 cookies

Ingredients:
4 egg whites, room temperature
1/8 teaspoon salt
1/2 teaspoon cream of tartar
1 cup caster sugar (finely granulated sugar)
1-1/2 teaspoons almond extract
1/2 teaspoon vanilla extract
2 tablespoons ground almonds, for topping

Directions:

1. Preheat the oven to 225°F. Line 2 baking sheets with parchment paper and set aside.

2. In a clean, dry bowl of a stand mixer, combine the egg whites, salt, and cream of tartar. Use the whisk attachment and beat at medium speed until ingredients are combined and soft peaks have formed.

3. Beat the mixture on high speed, gradually adding the caster sugar 1 tablespoon at a time. Pause for about 15 seconds between each addition to ensure the sugar has dissolved. Scrape the sides of the bowl as needed to incorporate the sugar with the egg white mixture evenly. Continue beating for several minutes until all the sugar has been added and stiff, glossy peaks begin to form. Stir in the almond and vanilla extracts.

4. Use a large spoon to scoop the meringue batter into a large pastry bag outfitted with a star tip. Pipe small dollops, roughly 1-1/2" in size onto the parchment paper. Repeat this filling and piping process until all of the meringue batter has been used.

5. Top the meringues with crushed almonds and bake for 1 hour. Without opening the oven door, turn off the oven and let the meringues cool completely in the oven for an additional hour or two. (Cooling in the oven helps keep them crisp on the outside while the gradual cooling keeps them from cracking).

6. Remove meringues and enjoy! Serve with fruit compote and berries, or enjoy by themselves.

Raspberry Scones

Lia Soneson

Fresh raspberries burst with flavor in these scones! The bright berry flavor marries perfectly with the lemon zest and sweet lemon glaze. With a food processor, these scones are mixed quickly, and are ready-to-eat in just a few minutes -- fresh-baked from the oven!


Raspberry Scones
Makes 8 scones

Fresh raspberries burst with flavor in these scones! The bright berry flavor marries perfectly with the lemon zest and sweet lemon glaze. With a food processor, these scones are mixed quickly, and are ready-to-eat in just a few minutes -- fresh-baked from the oven!

Ingredients:
2 cups all-purpose flour
3 tablespoons sugar
2 teaspoons baking powder
1/2 teaspoon baking soda
1/2 teaspoon salt
6 tablespoons unsalted butter, extra cold and grated
1 cup fresh raspberries, washed and dried well
1/2 cup cream
1/2 cup sour cream
2 large eggs (one egg for the scone dough, one egg whisked to brush the tops of the scones)
1 teaspoon vanilla extract
1 teaspoon lemon zest
1 teaspoon lemon juice

Glaze Ingredients:
3/4 cup confectioners’ sugar, sifted
2-3 tablespoons fresh lemon juice
Additional lemon zest for garnishing, (optional)

Directions:

1. Preheat oven to 425°F.

2. Measure all of the dry ingredients (flour, sugar, baking powder, baking soda, and salt) into a large bowl. Mix dry ingredients well so that all elements are evenly distributed across the mixture. If mixing the scones by hand, a whisk or broad spatula will accomplish the job easily. If mixing with a food processor, pulse the dry ingredients a couple of times to mix the dry components.

3. Grate very cold butter with a coarse grater. If mixing scones by hand, the butter may be incorporated into the flour by (1) using a pastry blender, (2) employing two knives in a scissors motion, or (3) by hand with a quick pressing motion. If mixing with a food processor, add the grated butter to the flour mixture in the work bowl. Pulse a few times until a coarse crumb results.

4. Add the dry ingredients to a large mixing bowl. Add, by hand, the raspberries (washed and well-dried) and lemon zest to the dry mixture, and stir until evenly distributed.

5. Mix the wet ingredients together. In a medium bowl, whisk together the cream, sour cream, one egg, lemon juice, and vanilla extract until well-combined. From here, we suggest mixing the scones by hand.

6. Add the liquid all at once to the dry ingredients. Mix using a folding motion with a large spatula. Do not over mix; the dough will be shaggy in character. Turn the dough and scraps out onto a lightly-floured working surface.

7. Using a light touch, bring the dough and loose scraps together, and gently gather into a single mass. Push the dough around a bit, folding it over 5-6 times. That’s it, no more. Too much kneading will activate the gluten in the flour and result in a tougher scone. Use just enough flour to keep things from sticking, but as little excess as possible.

8. Pat the dough into a circle with a thickness of about 3/4-inch to 1-inch. Use a pastry or dough cutter to cut the dough into 8 even wedges. Beat the second egg in a small dish and then brush the egg wash on the scones. Place the scones a few inches apart on a parchment-lined baking pan on the middle rack of the oven – if too low, the bottoms may darken; if too high, the tops may brown too quickly. Bake for 13-15 minutes or until the internal temperature of the scones reaches at least 182° F.

9. While the scones cool on a cooling rack, whisk the glaze ingredients together, by adding the lemon juice slowly until a good drizzling consistency is achieved. Use a whisk to drizzle the lemon glaze on the cooling scones. If desired, sprinkle additional lemon zest on top of the glazed scones. Enjoy while still slightly warm. (Go ahead and add a dose of butter to the warm insides!)

Eggs Benedict

Lia Soneson

While there are several components to a great Eggs Benedict recipe, each element is really quite simple to achieve. We love how impressive this dish is to serve, and by following our step-by-step plan you can master it! The bright and silky Hollandaise sauce is so good you'll want to make it often for topping a variety of foods. It's time to make an inspired brunch at home -- give our Eggs Benedict a try!


Eggs Benedict
Serves 2

Ingredients:
2 English muffins, toasted and buttered
8 slices Canadian bacon
1 avocado, sliced
4 eggs, poached garnish with chives

Hollandaise Sauce:
2 egg yolks
1 tbsp fresh lemon juice
4 tbsp butter, melted pinch of cayenne salt & pepper, to taste

Directions:
Prep the components:
1. Cook the bacon. In a skillet, warm the bacon on both sides until golden brown.
2. Slice the avocado into slices. Mince the chives.
Prep the Hollandaise ingredients:
3. Separate the egg yolks and add the lemon juice to the egg yolks. Melt the butter in a separate dish. Prepare a double boiler or set-up a metal or heat-safe glass bowl over a saucepan filled with a little water. Bring the water to a rolling boil, then turn down to a simmer.
Prepare to make the poached eggs:
4. Bring 2-inches of water to a low boil in a large skillet. Prepare the 4 eggs to poach by carefully cracking each egg into individual small bowls.
5. Once you have the water simmering in the double boiler, and when the eggs and all the toppings are set - it's go time! Prepare the Hollandaise first, then poach the eggs.
Prepare the Hollandaise sauce:
6. Begin the Hollandaise sauce by whisking the eggs and lemon juice until the volume doubles in size. Place in the top of the double boiler, while continuing to vigorously whisk. Drizzle the melted butter in slowly while whisking. Continue to whisk until the sauce thickens and easily coats the back of a spoon. Stir in the pinch of cayenne, and salt to taste. If needed, add a teaspoon of water to thin the sauce.
Poach the eggs:
7. Poach the eggs by carefully lowering each bowl into the water. Simmer the eggs for about 4-5 minutes, then carefully remove with a large slotted spoon. If the muffins aren't ready for the eggs, you may place them on a plate, then transfer to the loaded English muffin afterwards. A large slotted spoon makes removing the poached eggs easy! TIP: When poaching several eggs at once, start at 12 o’clock and add each egg in a clockwise circle so you know which egg to remove from the pot first, second, and so on.
Assemble the Eggs Benedict:
8. While the eggs poach, toast the English muffins and butter them. Layer the toasted muffins with the cooked bacon and sliced avocado. Carefully place the poached egg on top and then drizzle with the Hollandaise sauce. Garnish with chives and serve immediately!

Bananas Foster

Lia Soneson

Warm, caramelized bananas + ice cream + fire? Yes, please! Not only does this dessert deserve a live audience, but the flavors are truly unbeatable. Existing in a category all its own, this New Orleans classic is all about technique and we are here to walk you through it, each step of the way!


Bananas Foster
Serves 4

Ingredients:

2 bananas, halved and sliced diagonally
1 lemon, juiced
4 tablespoons unsalted butter
1/2 cup light brown sugar, packed
1/4 teaspoon cinnamon
1/4 teaspoon nutmeg
1/8 teaspoon salt
2 tablespoons banana liqueur (such as Crème de Banana)
1/4 cup dark rum (80 proof or higher)
1/2 pint vanilla ice cream, for serving
1/2 cup toasted, chopped pecans (optional)

Directions:

1. Gather and prep all the ingredients – this is a dish that happens quickly! (We even like to pre-scoop the ice cream and have it ready in the freezer for the individual serving bowls.)

2. Peel, then cut the bananas lengthwise. Drizzle the slices with lemon juice to reduce browning.

3. In a low-sided cast iron skillet, melt the butter and add the brown sugar, cinnamon, nutmeg, and salt. Whisk and allow the mixture to heat and become bubbly.

4. Add the banana slices carefully -- the butter-sugar mixture is very hot and may create splatters. Allow the slices to cook on one side for 45-60 seconds, gently turn the slices, and cook for another 45-60 seconds. The idea is to warm the bananas, not to cook or allow them to become mushy.

5. Remove the skillet from heat. Add the banana liqueur and rum. Return the skillet to the burner, and allow the mixture to become warm again. As the mixture bubbles, the alcohol will burn off. If you choose to flambé the dish, carefully light the mixture just as it becomes warm again and before the alcohol burns away; the flames will erupt and burn off in about 30 seconds. (Be cautious! The flame can ignite quickly and will be very large! Have a lid handy to quickly extinguish any out-of-control flaming.)

6. Once the alcohol has evaporated, or burned off, spoon the bananas and sauce over scoops of vanilla ice cream. Sprinkle the toasted pecans on top, and serve immediately.

DEVELOPED IN NEW ORLEANS IN THE 1950s, this dessert is easily assembled and guaranteed to satisfy all those around the table. The legend behind the dish stems from an abundance of bananas. At the time, New Orleans was a major port for banana imports. The chef, Paul Blangé, of famous New Orleans restaurant, Brennan’s, devised the dessert to make use of the area’s bananas. The dish was named for a friend of the restaurant’s owner, Richard Foster. Whether or not the dish is flamed, the dessert’s reputation as a delicious dessert is well-deserved.

Roasted Carrots with White Bean Puree and Crispy White Beans

Lia Soneson

Looking for a creative carrot side dish? Enjoy these beautifully roasted carrots dressed with a honey-lemon drizzle and served on a smear of white bean purée. If you’re feeling fancy, finish off the dish with fresh dill and a garnish of crispy white beans for a little extra crunch. Best carrots ever!


Roasted Carrots with White Bean Puree and Crispy White Beans
Serves 4 - 6

Crispy White Bean Ingredients:
1 can (14.5 oz) white beans
2 tablespoons olive oil
1/4 teaspoon Kosher salt
1/4 teaspoon freshly cracked black pepper
Zest of one lemon

Roasted Carrot Ingredients:
1 pound carrots, cut in half lengthwise (we used whole heirloom baby carrots with stems)
1/2 teaspoon Kosher salt
1/2 teaspoon cracked black pepper
2 tablespoons olive oil
4 tablespoons butter
1 tablespoon fresh lemon juice
2 tablespoons honey
Dill, for garnish

White Bean Puree Ingredients:
1 can (14.5 oz) white beans
2 tablespoons olive oil
1 clove garlic
1 tablespoon tahini
Kosher salt, to taste
Cold water, as needed to thin

Directions:

1. Preheat the oven to 425°F.

2. Prepare the crispy white beans. Rinse the beans, then lay to dry on a clean kitchen towel or paper towel. Pat the beans until very dry, then toss with olive oil, Kosher salt, pepper, and lemon zest. Bake in a single layer on a parchment-lined sheet pan for 20-25 minutes, or the until beans have turned crispy. Stir halfway through baking.

3. While the beans roast, prepare the white bean purée. In a food processor, purée one can of white beans with one clove garlic, two tablespoons of olive oil, and tahini. Taste the purée, and salt to your desired level. Blend until very smooth, adding a few tablespoons of cold water to thin, as needed.

4. Prepare the carrots. Wash, peel, and cut the carrots lengthwise.

5. Drizzle the carrots with olive oil, and season well with Kosher salt and pepper.

6. Place the carrots in a single layer of a sheet pan, and roast the carrots for 10 minutes.

7. While the carrots are roasting, prepare the lemon-honey glaze. Melt the butter in a small dish, and then mix with the lemon juice and honey until well combined.

8. After 10 minutes, take the carrots out of the oven and drizzle with the lemon-honey mixture, then return to the oven for another 10 minutes, or until the carrots are roasted to your desired level of tenderness.

9. Once the carrots have roasted, prepare a serving dish or individual plates with a smear of the white bean purée. Add the roasted carrots, and garnish with fresh dill and the crispy white beans.

Garlic, Herbed Linguine with Mussels

Lia Soneson

Our elegant recipe for herbed linguine with mussels highlights the beautiful briny flavors of this special shellfish. A light, yet satisfying garlic-wine sauce complements the delicate mussels alongside the herbed pasta. This dish anchors the menu for an evening of deliciousness.


Garlic, Herbed Linguine with Mussels
Serves 4-6

Ingredients:
2 tablespoons olive oil
1/4 cup butter
4 garlic cloves, sliced
3 shallots, diced
1 teaspoon fennel seeds
1/4 teaspoon red pepper flakes
3/4 cup dry white wine
2 tablespoons white wine vinegar
4 cups seafood or vegetable broth, divided
2 lbs cultivated mussels, cleaned
1 lb thin linguine
1/4 cup half-and-half, room temperature
3/4 teaspoon Kosher salt
1/2 teaspoon black pepper

Garnish:
1 cup fresh parsley, chopped
1/2 cup Parmigiano-Reggiano, shredded
1 lemon, cut into wedges
Additional salt and pepper

Directions:
1. In a large pot over medium-low heat, melt the olive oil and the butter. Add the garlic, shallot, fennel seeds, and red pepper flake. Cook for about 2-3 minutes, or until the shallots soften. Be careful not to scorch the garlic. Add the white wine, white wine vinegar, and one cup of the broth, and bring to a boil. Once boiling, reduce to a low heat and simmer for 20 minutes. allowing the flavors to incorporate, and for the broth to reduce.

2. Bring the broth to a boil again, and add the mussels. Cook for about 3-5 minutes, shaking the pot occasionally until the mussels have just opened. Transfer the mussels to a bowl and tent with foil in order to keep them warm. Discard any mussels that did not open during cooking.

3. Add the remaining 3 cups of seafood (or vegetable broth) to the reduced shallot mixture, and bring the broth back to a boil. Add the linguine. Continue to boil the linguine in the broth, stirring often, until it begins to become just tender. TIP! Stir the pasta often; add more liquid (broth or water) if needed, to prevent the linguine from sticking to the bottom of the pot as it cooks!

4. Return the mussels to the pot and cover, simmering until the pasta is al dente, about 3 additional minutes. Stir in the half-and-half, salt, and pepper and cook for an additional minute.

5. Serve immediately with a generous amount of parsley, a sprinkle of Parmigiano-Reggiano, lemon wedges, and salt and pepper to taste.

Crunchy and Creamy Chicken Salad

Lia Soneson

Everyone has a favorite way to make chicken salad! Our version uses some classic additions: crunchy celery, sweet grapes, and a creamy dressing. Serve this delicious chicken salad in a sandwich, atop a lettuce wrap, or simply with crackers. A delicious lunch is served!


Crunchy and Creamy Chicken Salad
Serves 4 - 6

Ingredients:
2 pounds chicken breast (or about 3 chicken breasts)
3 tablespoons butter
3 slices of lemon
3 celery ribs, diced (about 1 cup)
3 green onions, sliced (about 1/2 cup)
1 cup red grapes, halved
1/2 cup walnut pieces

Dressing Ingredients:
1/2 cup mayonnaise
1/4 cup plain Greek yogurt
2 tablespoons fresh lemon juice
2 tablespoons stone ground mustard
2 tablespoons sugar
1 teaspoon Kosher salt
1/2 teaspoon pepper
1/4 teaspoon garlic powder
1/2 teaspoon poppy seeds
Pinch of cayenne pepper

For Serving:
Sliced bread or croissants
Lettuce leaves

Directions:
1. Preheat the oven to 400°F. Place the chicken breasts on a sheet of aluminum foil. Sprinkle the chicken with Kosher salt and pepper. Top each breast with a tablespoon of butter and a slice of lemon. Fold the foil into a packet sealing the chicken inside. Place the packet inside of a baking dish. Bake until the chicken is cooked to 165° F, about 15-20 minutes.

2. While the chicken bakes, prepare the celery by trimming and dicing. Slice the green onions, halve the grapes, and measure out the walnut pieces.

3. Mix all of the dressing ingredients together in a medium-sized bowl. Whisk until combined.

4. Once the chicken has reached 165°F, remove from the oven and let rest for 10 minutes. Once the chicken has reabsorbed its juices, dice into 1/4-inch pieces. Place the diced chicken in a large bowl.

5. Let the chicken cool, then mix with the celery, green onions, grapes, and walnuts. Add the dressing and mix until evenly coated. Taste, and adjust seasonings and mix-ins to your preference. Let the chicken salad sit for about 30 minutes to allow the flavors to blend together.

6. Serve on bread or croissants with a crisp lettuce leaf.

Broccolini, Escarole, and Radicchio Salad with Anchovy Dressing and Toasted Walnuts

Lia Soneson

Tired of making the same salads? Turn things up a notch and celebrate the winter harvests. Spicy, bitter escarole happily pairs with nutty, roasted broccolini. Creamy parmesan mellows out the dish, while an anchovy dressing adds an umami punch that will have you scooping up seconds.


Broccolini, Escarole, and Radicchio Salad with Anchovy Dressing and Toasted Walnuts
Serves 6

Salad Ingredients:
3 lbs broccolini (about 3 bunches)
2 tablespoons olive oil
1/2 teaspoon salt
5 cups torn escarole (~2 sm heads or 1 lg head), pale green and yellow leaves only
1/4 medium head of radicchio, cut crosswise into 1/2” pieces

Anchovy Dressing Ingredients:
6 anchovy filets, drained and finely chopped
1 tablespoon fresh lemon juice
1/2 cup olive oil
1/2 teaspoon Kosher salt
1/4 teaspoon black pepper
2 cloves garlic, minced
1 shallot, minced
1-1/2 teaspoons Dijon mustard
1/2 tablespoon honey

Topping Ingredients:
1 cup walnuts
toasted Parmesan cheese, shaved
1/2 cup torn dill fronds

Directions:

1. Prep the broccolini. Preheat the oven to 425° F. Wash the broccolini, cut back stalks, trim off leaves, and cut larger pieces in lengthwise sections. On a rimmed baking sheet, toss the broccolini in 3 tablespoons olive oil and salt. Roast the broccolini until it becomes tender, about 15-20 minutes, turning halfway through using tongs. Let the broccolini cool, and prepare the rest of the salad.

2. Make the dressing. In a wide-mouthed jar, combine and whisk together all of the dressing ingredients.

3. Toast the walnuts. In a small sauté pan over low heat, toast the walnuts until slightly browned and fragrant, about 2-4 minutes, tossing frequently to prevent burning.

4. In a large bowl, toss the cooked broccolini, torn escarole, and radicchio pieces with the dressing.

5. Assemble the salad. Sprinkle with walnuts, shaved parmesan, and fresh dill. Serve immediately.